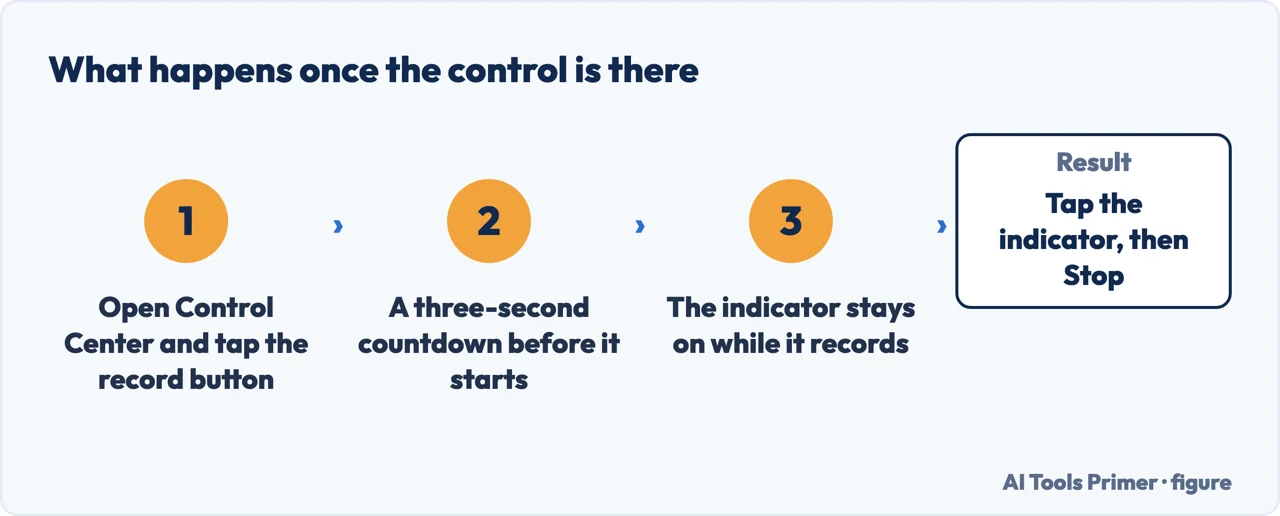
How to screen record on iphone is a four-line answer, and Apple publishes it: swipe down from the top-right corner, tap the grey Record button, wait for the 3-second countdown, then leave Control Center. To stop, tap the recording indicator at the top of the screen, then Stop.
Those four lines work perfectly, and they are still not enough on their own. Three separate things stop them, all three are documented, and no page that gives you the four lines tells you about any of them. This guide is about the three, because the four lines you already have.
Wall oneThere is no Record button in Control Center.
It is not there by default on every phone, and Apple says so plainly:
“If you don’t see the Record button, add it to your Control Center.” This is the single
most common reason the instructions fail, and the strip below is the fix.
Wall twoThe recording has no sound.
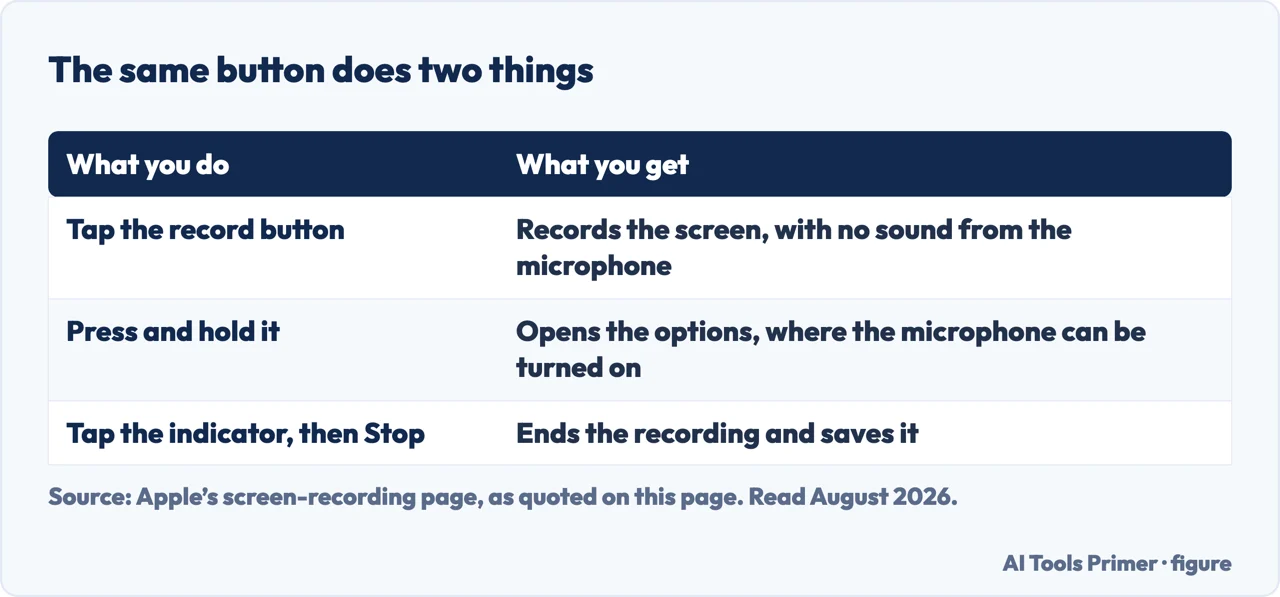
Because tapping the button starts a silent recording. The microphone is on a
second screen you reach by touching and holding the button instead of tapping it. Nothing
on screen suggests the second screen exists.
Wall threeThe recording came out black.
Not a fault. Apple: “Some apps might not allow you to record their content.”
Streaming apps refuse, and the recording is made anyway — you find out afterwards. The same page
adds a second conflict: “You can’t record your screen and use screen mirroring at the same time.”
The first wall explains a search pattern that would otherwise make no sense. Alongside people looking for how to screen record, a large second group is looking for how to add screen record on iphone — they have found the instructions, followed them, and hit a Control Center with no such button in it. The instructions were not wrong. The button simply is not guaranteed to be there.
Putting the Record button where it belongs
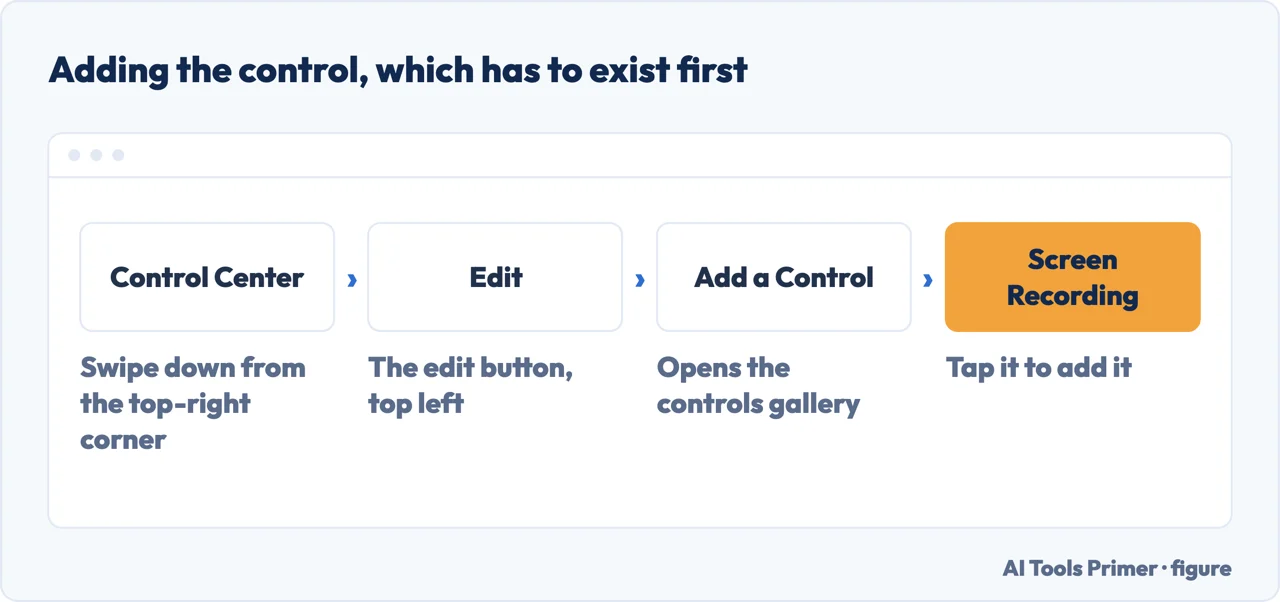
Apple’s route for adding any control, applied to this one. It takes about fifteen seconds.
Swipe down from the top-right corner to open Control Center.
Tap the edit button at the top left to begin editing the controls.
Tap Add a Control at the bottom of the screen. This opens the controls gallery.
Tap Screen Recording to add it.
Close Control Center by swiping up from the bottom centre of the screen.
While you are on that screen, two things are worth doing at the same time. Drag the control to a
position your thumb reaches without looking — you will be starting recordings one-handed. And drag
the handle at its lower right to resize it, because a control you are aiming at in a hurry
benefits from being larger than the default.
The control has to exist before you can use it. Figure drawn by AI Tools Primer.Three seconds, then it is recording. Figure drawn by AI Tools Primer.Hold it for the microphone option. Figure drawn by AI Tools Primer.
The second wall is the one worth reading twice, because it is invisible by design. The route to recording with sound is not a setting and not a menu: touch and hold the Record button rather than tapping it, tap Microphone to turn it on, then tap Start Recording and wait for the countdown. Nothing on the button hints that holding it does something different from tapping it.
It is also worth being clear about which sound you have just turned on. The microphone records the room — your voice, and everything else in it. It is not a switch for the audio the phone itself is producing, which is captured either way where the app permits it. If you are narrating a demonstration you want the microphone on; if you are capturing a video to keep, you almost certainly want it off, and the second screen is where you turn it back off again.
That the microphone is a separate decision rather than a default is visible in somebody else’s instructions too, which is the closest thing to a second opinion available on a phone only one company documents. Zoom’s support article for sharing an iPhone screen in a meeting — prerequisite “iOS 11 or higher” — runs Share Content, then Screen, then “Tap Microphone Off/Microphone On to enable or disable device audio”, and only then “Tap Start Broadcast”. A different company, documenting a different job on the same phone, still has to stop and put the microphone in front of you as a step of its own. Zoom adds a limit of its own worth knowing before you rely on that route: “You cannot annotate when sharing your entire screen via iOS.”
The third wall is the one people report as a bug. A recording that plays back as a black rectangle, or with a black rectangle where the video was, is not a broken phone: it is an app declining to be recorded, and the phone recording the refusal rather than the content. The recording still happens, still takes up space, and still lands in your library. There is no setting that changes this, on any phone, and a page offering you one is selling something.
When it does work, the file goes somewhere specific and slightly buried. Screen recordings save automatically to the photo library, and there is a dedicated place for them: open Photos, tap Collections, scroll down to Media Types, then tap Screen Recordings. That is the fastest way to find one from last week without scrolling a year of photographs.
One last diagnostic, for the case where none of the above applies because you cannot even open Control Center. There is a setting that switches it off inside apps: Settings › Control Center › Access Within Apps. If swiping down works on the Home Screen but does nothing inside the app you are trying to record, that switch is the reason, and it is off.
The guides below take the pieces separately: getting the button in place, recording sound properly, the apps that refuse, and what to do with the file afterwards — which is usually to trim it, because a screen recording is almost always longer than the thing you meant to capture.
The preparation that decides whether you record once or four times. None of it takes longer than the recording itself, and the first guide is the one that deals with what stops a recording before it starts.
Not covered here. It will not recommend a screen recording app. The phone does this natively; the App Store is full of subscriptions wrapped around that built-in feature, and several ask for permissions no recorder needs.
It will not promise a way around apps that block recording. There is not one, the pages claiming otherwise are selling software, and the software does not work either.
And it will not pad the steps. Apple’s instructions are four lines. Everything added here is a documented obstacle, with the page it came from listed at the bottom. What holds instead is simple: every step, limit and menu location on this page is taken from Apple’s own support pages and iPhone User Guide, with one second reading from Zoom, listed below with the dates they were read.
Showing somebody what is on your screen
Onto a television, into a file, or up to somebody else. The screen is the easy part; getting it out of the room is the hard part.
Apple Support — Record the screen on your iPhone, iPad, or iPod touch (the four steps, the missing-button note, the apps that refuse and the mirroring conflict). Published 2 December 2025 — support.apple.com, read 22 August 2026.
Apple — iPhone User Guide, Take a screen recording (the touch-and-hold route to the Microphone toggle, and the Screen Recordings album under Media Types) — support.apple.com, read 22 August 2026.
Apple — iPhone User Guide, Use and customize Control Center on iPhone (adding a control from the gallery, resizing it, and the Access Within Apps setting) — support.apple.com, read 22 August 2026.
Zoom Support — Sharing your iOS screen from the Zoom mobile app (the iOS 11 or higher prerequisite, the microphone step immediately before Start Broadcast, and the limitation that you cannot annotate when sharing your entire screen via iOS) — support.zoom.com, read 5 September 2026.
AG
Written by Alberto Gulotta
Founder and editor of AI Tools Primer, writing from Palermo, Italy. Thirty-five years of
taking computers apart, starting with a Commodore 64 — the long version is on the
about page.
Written on 21 August 2026 · last checked 5 September 2026.
§
Independence and limits
No affiliate links and no paid placements anywhere on this site. Nobody pays to appear here,
and no company has seen this page before you did.
This is general information, not professional advice. Where a page touches money, health,
safety or the law, it names its source and the date it was read — and your situation may
still differ. See the privacy page and the
cookie policy.