
Images · guide
How to fix overexposed photos, and what clipped white has lost
By Alberto Gulotta · Updated · 10 min read
How to fix overexposed photos: open the photo in an editor and lower Highlights for the brightest areas, or Exposure if the whole picture is too light. On an iPhone that is Photos › Edit › Adjust. Adobe says clipped areas that are completely white have no image detail.
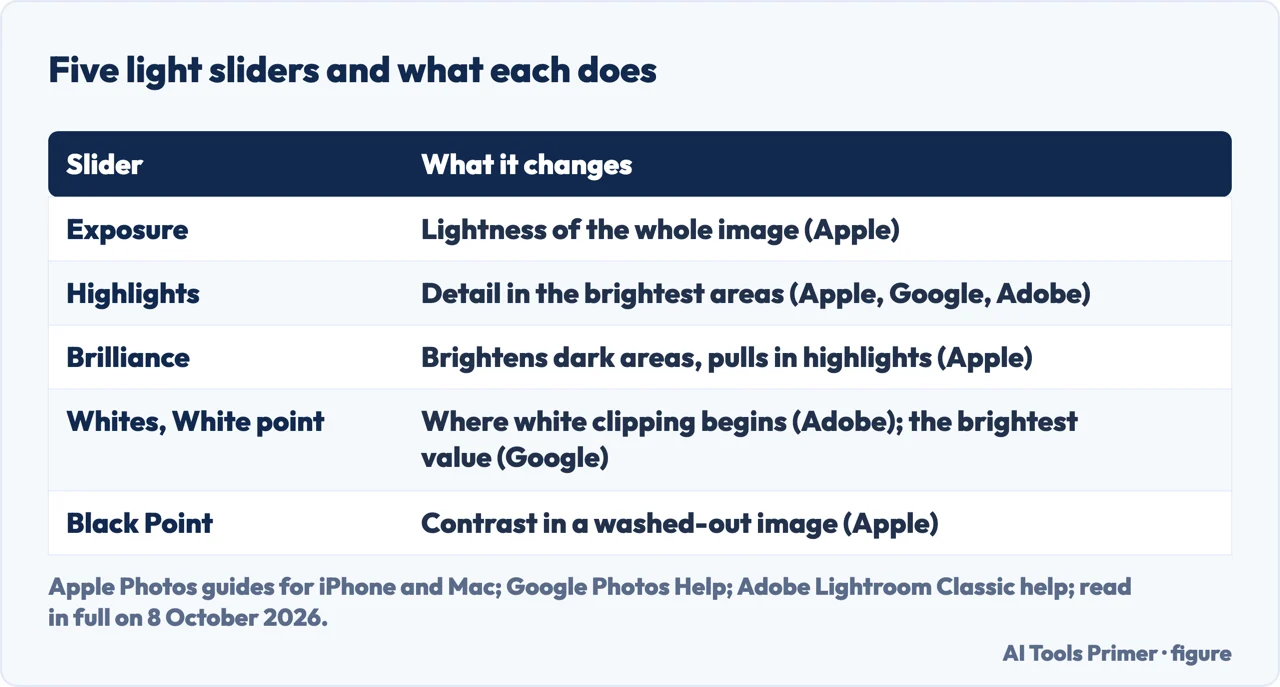
| Slider | What it changes | Where |
|---|---|---|
| Exposure | The lightness or darkness of the entire image (Apple, Photos for Mac) | Photos on iPhone and Mac; Lightroom |
| Highlights | Detail in the brightest areas (Google); to the left, recovers “blown out” detail (Adobe, Lightroom Classic) | Photos on iPhone and Mac; Google Photos on a computer; Lightroom |
| Brilliance | Brightens dark areas, pulls in highlights, adds contrast (Apple, Photos for Mac) | Photos on iPhone and Mac |
| Whites, or White point | Where white clipping begins (Adobe); the brightest value (Google) | Lightroom; Google Photos on a computer |
| Black Point | Can improve the contrast of a washed-out image (Apple) | Photos on Mac; Google Photos on a computer |
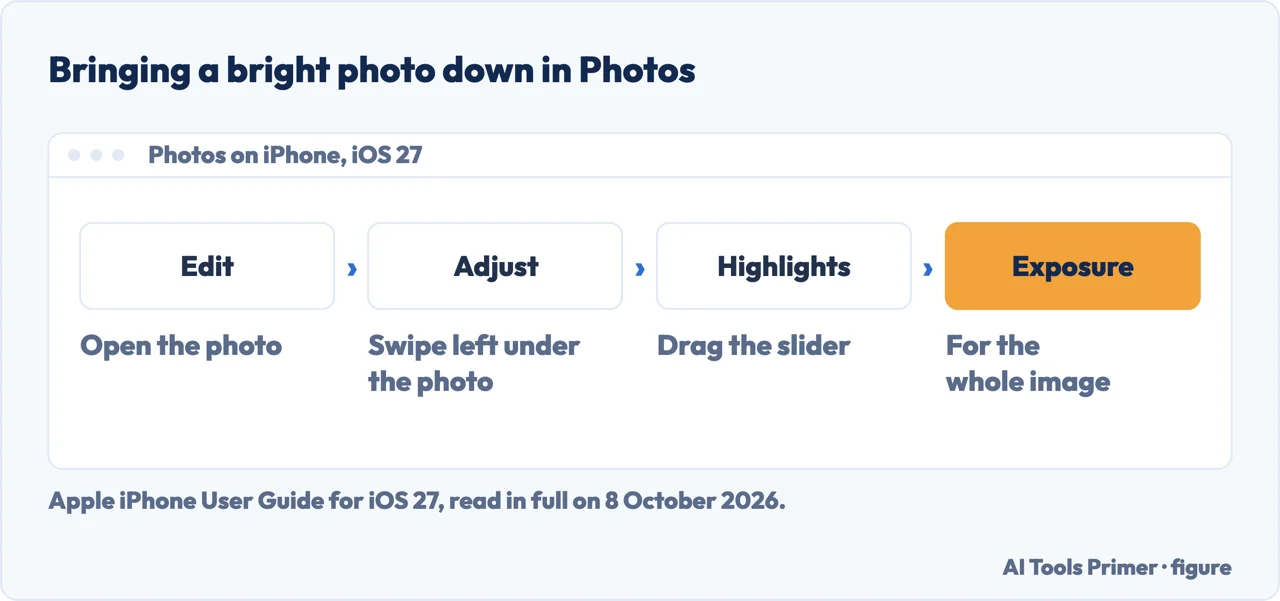
- Open the photo in Photos and tap Edit. Apple’s iPhone User Guide for iOS 27 starts here for light and colour.
- Tap Adjust. Swipe left under the photo to see the settings.
- Highlights, for the brightest parts. Apple’s Photos guide for Mac describes Highlights as adjusting the highlight detail, and Exposure as adjusting the lightness or darkness of the entire image; the iPhone guide lists both without a definition.
- Exposure, if the whole picture is too light. Tap a setting and drag its slider; the outline around each button shows how much it has changed, and tapping a setting’s button compares the edit with the original.
- Tap Done, or Cancel and Discard Changes. Apple also offers the automatic enhance button, which adjusts light and colour in one tap.
What a slider cannot bring back
Pure white has nothing in it. Adobe’s help for Lightroom Classic defines clipping as pixel values pushed to the highest highlight value, and says clipped areas are completely white or completely black, with no image detail.
Part of it sometimes can. The same page: if at least one colour channel in a clipped area still has colour, some detail might be recovered from it; under the Recovery slider of the older process versions (PV2010 and PV2003), it says Lightroom Classic can recover detail in raw image files when one or two channels are clipped. Its clipping indicator turns white when all channels clip, and coloured when one or two do.
What that means for a white sky. A sky that keeps colour in one channel may give some detail back; a sky clipped to white in all three has none to give. That is our reading of Adobe’s two sentences, not a sentence of Adobe’s.
Photos on a Mac
Apple’s Photos guide for Mac: double-click the photo, Edit, Adjust, then Options below Light. Seven sliders appear: Brilliance, Exposure, Highlights, Shadows, Brightness, Contrast and Black Point. Black Point sets where the darkest parts become completely black, which Apple says can improve the contrast in a washed-out image. Holding Option over a slider extends its range; double-clicking a slider resets it; Auto lets Photos choose.
Google Photos
On a computer. Google’s help gives photos.google.com, the photo, Edit, Adjust, then a dial for each setting, on a device with at least 4 GB of RAM: Brightness for overall lightness, Highlights for detail in the brightest areas, White point for the brightest value. Revert undoes the edits later.
On Android. In the Google Photos app the tools are under Edit, with Brightness, Contrast and an HDR effect in Adjust; Google says Edit › Search finds a tool such as Brightness by name. Save changes the original; Save as copy keeps it, and changes saved as a copy can’t be undone. Google lists 3 GB of RAM and Android 8.0 or later for most editing features.
Raw files. Google Photos converts a raw photo to JPEG when it edits it in its own editor, and offers the original raw file for download to an editor that handles raw, naming Lightroom and Photoshop on the web and Photopea.
Lightroom, slider by slider
Lightroom on the web. Edit, then Light: Exposure for overall brightness, Highlights to the left to darken highlights and recover details, Whites to the right to make more colours completely white. Adobe’s page was last updated on 28 April 2026.
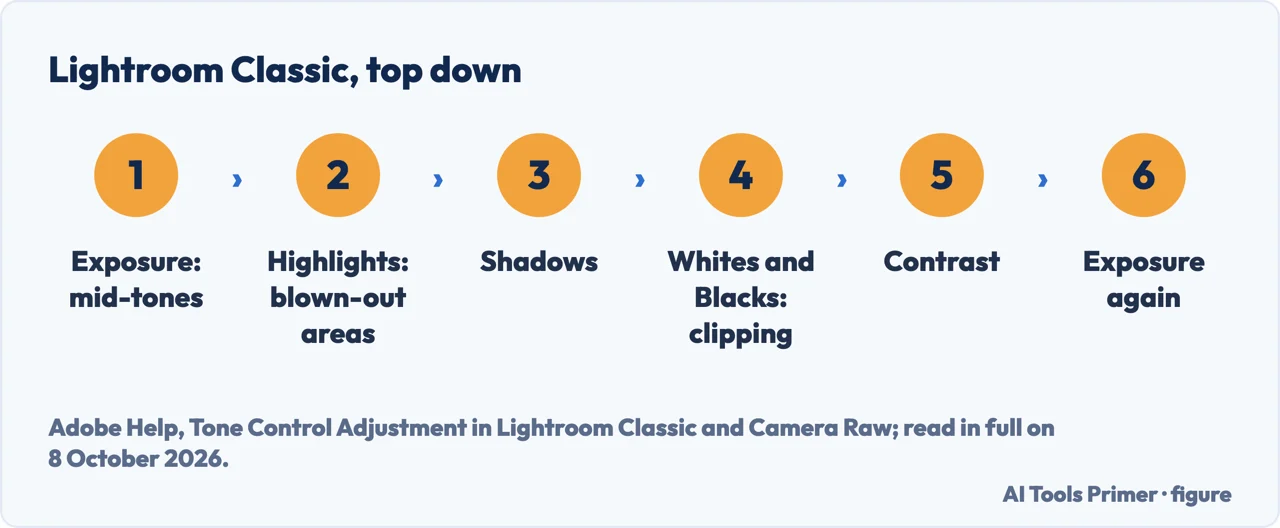
Lightroom Classic and Camera Raw: an order. A procedure on Adobe’s help site, based on a contribution by Todd R. Shaner and applying to Lightroom 4 and later and Camera Raw 7.0 and later, but not to the cloud-based Lightroom desktop app, works from the top down: Exposure for the mid-tones, then Highlights until the blown-out areas come back, Shadows, then Whites and Blacks with the Alt or Option key held to see where clipping starts, then Contrast, and a last touch to Exposure. Its target ranges put Highlights on the 70–90% levels and Whites on 90–100%.
Auto. Adobe’s tone page says Auto in the Basic panel sets the sliders to maximise the tonal scale and minimise highlight and shadow clipping.
Before the next photo, on an iPhone
Tap and drag. Apple: the camera sets focus and exposure itself, and face detection balances exposure across faces. Tap where the focus should go, then drag up or down next to the focus area to change the exposure.
Lock it. Touch and hold the focus area until AE/AF Lock appears; tap the screen to unlock. Or tap or swipe up from the camera modes at the bottom of the screen, tap Exposure and drag the slider: it stays until Camera is next opened, unless Settings › Camera › Preserve Settings › Exposure Adjustment is on. On supported models with Camera Control, a light double-press opens an overlay of camera settings, where Exposure can be selected.
Other fixes to the same photo. A picture that has turned blocky is in how to fix pixelated photos, making it smaller on the phone is in how to resize a photo on iPhone, and trimming the edges on a Mac is in how to crop on a Mac.
Where to start
Six ways in.
- “On my iPhone.”
- Photos on iPhone — on an iphone
- “The sky is just white.”
- What cannot come back — what cannot come back
- “On my Mac.”
- Photos on Mac — on a mac
- “In Google Photos.”
- Google Photos — google photos
- “In Lightroom.”
- Lightroom — lightroom
- “Next time.”
- Before the photo — before the next photo
More on photos
The size, the frame and the library each have a guide of their own.
Questions people also ask
How to fix overexposed photos on iPhone?
In Photos, open the photo, tap Edit, then Adjust, and swipe to Highlights and Exposure; drag each slider and tap Done. Apple’s Photos guide for Mac describes Highlights as the highlight detail and Exposure as the lightness or darkness of the entire image. The automatic enhance button is an alternative.
How to fix photos that are too bright?
Lower Exposure or Brightness for the whole picture, and Highlights for the brightest parts: Apple’s Photos, Google Photos on a computer and Lightroom all have these sliders. Google Photos on a computer adds White point and Black point, and Photos on a Mac Black Point, which Apple says can improve the contrast of a washed-out image.
Why do my photos look overexposed?
Adobe’s Lightroom Classic help speaks of highlight detail lost because of camera overexposure. On an iPhone, Apple says the camera sets exposure by itself before each photo; tapping the subject and dragging next to the focus area changes it, and AE/AF Lock holds it.
How to correct for overexposure?
The Lightroom Classic procedure on Adobe’s help site works top down: Exposure for the mid-tones, then Highlights to recover blown-out areas, Shadows, then Whites and Blacks while watching the clipping. By our reading, areas clipped to white in all channels have no detail; with one or two channels clipped, Adobe says Lightroom Classic can recover detail in raw files.
Not covered here. It does not cover Photoshop, camera settings on a dedicated camera, or HDR capture; each has its own documentation.
Nor does it promise a result on a given photo: by our reading of Adobe’s page, how much comes back depends on the clipped channels, which only the photo can show.
Sources
- Apple iPhone User Guide for iOS 27 — Edit photos and videos on iPhone: Edit, Adjust, the settings to swipe through, and the enhance button — support.apple.com, read 8 October 2026.
- Apple Photos User Guide for Mac — Adjust light, exposure, and color in a photo or video on Mac: the seven Light sliders and Black Point — support.apple.com, read 8 October 2026.
- Apple iPhone User Guide for iOS 27 — Use iPhone camera tools to set up your shot: automatic exposure, dragging to adjust, AE/AF Lock and Preserve Settings — support.apple.com, read 8 October 2026.
- Adobe Help — How to adjust image tone and color, and work in grayscale in Lightroom Classic: clipping, the clipping indicators, Highlights and Whites, and recovery in raw files — helpx.adobe.com, read 8 October 2026.
- Adobe Help — Tone Control Adjustment in Lightroom Classic and Adobe Camera Raw: the top-down order and the target ranges, by Todd R. Shaner, last updated 29 July 2024 — helpx.adobe.com, read 8 October 2026.
- Adobe Help — How to adjust Light in an image, Lightroom on the web, last updated 28 April 2026 — helpx.adobe.com, read 8 October 2026.
- Google Photos Help — Edit your photos (computer): Brightness, Highlights, White point, Black point, Revert, and raw files — support.google.com, read 8 October 2026.
- Google Photos Help — Edit your photos (Android): Adjust, Edit › Search, Save and Save as copy, and the requirements — support.google.com, read 8 October 2026.
Written by Alberto Gulotta
Founder and editor of AI Tools Primer, writing from Palermo, Italy. Thirty-five years of taking computers apart, starting with a Commodore 64 — the long version is on the about page.
Something wrong on this page? Write to aitoolsprimer@gmail.com and it gets fixed.
Written on 8 October 2026.
Independence and limits
No affiliate links and no paid placements anywhere on this site. Nobody pays to appear here, and no company has seen this page before you did.
This is general information, not professional advice. Where a page touches money, health, safety or the law, it names its source and the date it was read — and your situation may still differ. See the privacy page and the cookie policy.