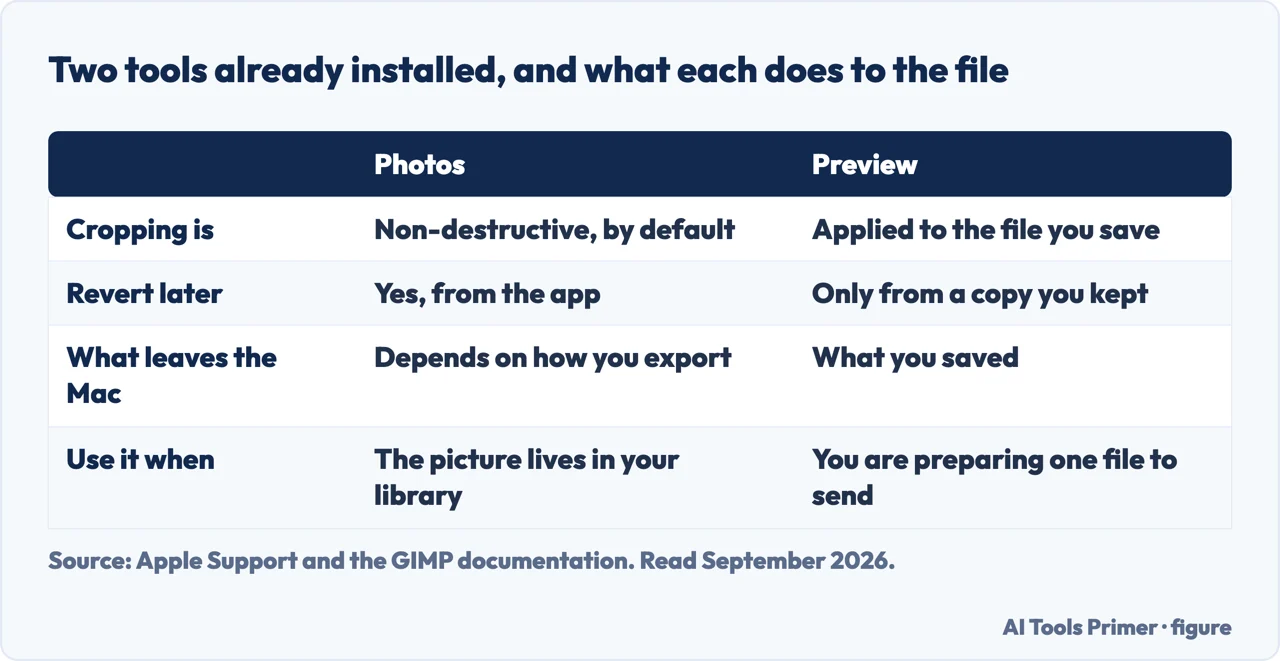
There are two answers to how to crop a picture on mac, both already installed, and they do genuinely different things. One edits the photograph in your library. The other edits a file on disk. Choosing the wrong one is how a crop you made for a Christmas card ends up in every album that photo appears in.
Apple marks this one Important
“Cropping a photo changes its appearance everywhere in Photos, including in albums,
slideshows, and projects. To edit a photo without changing it everywhere, first duplicate the photo
and then edit the duplicate.”
Read 22 August 2026, and it is the sentence this page exists for. A crop in Photos is not applied
to a copy — it is applied to the photo. Trim a group shot for a Christmas card and the same trim
appears in every album that picture sits in, in the slideshow you made last year, and in the shared
library. Duplicate first is a two-second habit that prevents all of it.
edits the library entry
Photos
Double-click the photo, Edit, then Crop. Apple’s shortcut list gives it one letter: “Crop a photo” is C.
Drag the rectangle, or click a ratio in the sidebar. Auto crops and straightens for you;
Flip mirrors it, and Option-click flips it vertically instead.
Two ways out, and they are different. Reset removes “the current cropping or straightening
changes”. Revert to Original stops “without saving your changes”.
edits the file itself
Preview
Open the image, show the Markup toolbar, select the part you want to keep, then crop. Apple notes
you can see the exact dimensions as you drag: Tools › Show Inspector, then pick a unit in
the Crop Inspector.
This one writes to the file on disk, so nothing else changes — and nothing else protects you
either. Apple gives the way back: “To undo the crop later, find a version of the image before the
crop. Choose File › Revert To › Browse All Versions.”
One keeps the pixels, one does not. Figure drawn by AI Tools Primer.
So the choice is not about which is easier. It is about what else you want to change. If the picture lives in your Photos library and you want it cropped from now on — a portrait you want tighter, a scan with a wonky edge — Photos is right, and the crop follows the photo everywhere, which is what you wanted. If you need one cropped copy for one purpose and everything else left alone, either duplicate it in Photos first, or do the job in Preview on a copy of the file.
The ratios in the Photos sidebar, and what each is for
Apple names the intent rather than leaving you to guess, which is unusual and useful.
Square
“For example, for a square photo, choose Square.” The safe choice for anything that will be displayed in a circle or a tile.
4:5 and the other presets
“For printing the photo, choose one of the preset aspect ratios, such as 4:5.” Print sizes are fixed, so cropping to them yourself beats letting a lab do it.
16:9
“To resize a photo for use in a high-definition video, choose 16:9.”
Custom
“Or choose Custom to enter a custom aspect ratio for a photo.”
Original
You can also “constrain the photo or video to its original aspect ratio” — a smaller version of the same shape, rather than a different shape.
Straightening is on the same screen and worth using. Apple lists three sliders — Straighten, Vertical and Horizontal — plus the Auto button that does both jobs at once. The two beyond “straighten” correct the leaning you get from pointing a camera up at a building or down at a document, which is the fault cropping cannot fix.
What a crop actually costs you. Pixels, and only pixels. The part you keep is untouched — nothing is degraded, nothing is re-encoded on the way. What shrinks is how large the result can be shown before it softens. A 48-megapixel photograph cropped to a quarter of its area is still a 12-megapixel photograph, which is more than enough for a screen and for most prints. Cropping is the cheapest edit there is, right up until you need the part you removed.
Which is why the recovery routes above are the important half of this page. In Photos, an edited photo can be returned to how it arrived. In Preview, the file has changed, and your way back is the Versions browser rather than an undo. Neither is a reason to hesitate — but knowing which one you are relying on is worth the ten seconds before you drag the rectangle.
Every image editor makes the same choice, and one of them shows you the switch. GIMP documents it as a default with a name: “a fairly recent change in GIMP is that by default the image canvas size isn’t changed after cropping”, and there is a Crop Tool option called “Delete cropped pixels” you tick “to make sure the canvas size is also adjusted to the cropped area”. That is the difference this page describes between the two Mac tools, stated as a checkbox: either the cropped pixels are still in the file or they are gone. Before sending a picture you cropped for a reason, it is worth knowing which of the two you did.
The warning about cropping everywhere, the tools, the shortcut, the aspect ratios and both recovery routes are quoted from Apple’s own Photos and Preview user guides, read on 22 August 2026 and listed below. The argument about which tool suits which job, and the note on what a crop costs, are ours.
Not covered here. It will not treat the two Mac crop tools as interchangeable. One changes the photograph everywhere and the other changes a file, and Apple says so.
It will not skip the duplicate step. Apple marks that warning Important, and it is the difference between one cropped picture and a whole library of them.
And it will not recommend an image editor for something both built-in tools already do. What holds instead is simple: the warning about cropping everywhere and both recovery routes are quoted from Apple’s own Photos and Preview user guides, read on the dates this page names.
Working on a picture before you use it
Five edits you make to an image between taking it and sending it.
Apple — Photos User Guide, Crop, extend, reframe, and straighten photos and videos on Mac (the article carried the shorter title Crop and straighten photos and videos when this page was written), including the warning that cropping changes the photo everywhere, the aspect ratio presets, Auto, Flip, the straightening sliders, Reset and Revert to Original — support.apple.com, read 16 September 2026.
Apple — Photos User Guide, Keyboard shortcuts and gestures on Mac, for the one that crops: the table gives Crop a photo as C — support.apple.com, read 16 September 2026.
Apple — Preview User Guide, Crop, resize, or rotate an image in Preview on Mac, including the Crop Inspector and File › Revert To › Browse All Versions — support.apple.com, read 22 August 2026.
GIMP documentation — Crop tool: the “Delete cropped pixels” option, and the default that leaves the cropped area in the file — docs.gimp.org, read 4 September 2026.
AG
Written by Alberto Gulotta
Founder and editor of AI Tools Primer, writing from Palermo, Italy. Thirty-five years of
taking computers apart, starting with a Commodore 64 — the long version is on the
about page.
Written on 22 August 2026 · last checked 23 September 2026.
§
Independence and limits
No affiliate links and no paid placements anywhere on this site. Nobody pays to appear here,
and no company has seen this page before you did.
This is general information, not professional advice. Where a page touches money, health,
safety or the law, it names its source and the date it was read — and your situation may
still differ. See the privacy page and the
cookie policy.