Shown too large
nothing wrong with the fileA small picture stretched across a big screen, or zoomed in. The pixels are fine; there are just fewer of them than the space. Shrink the display, not the image.

Images · guide
By Alberto Gulotta · Updated · 12 min read
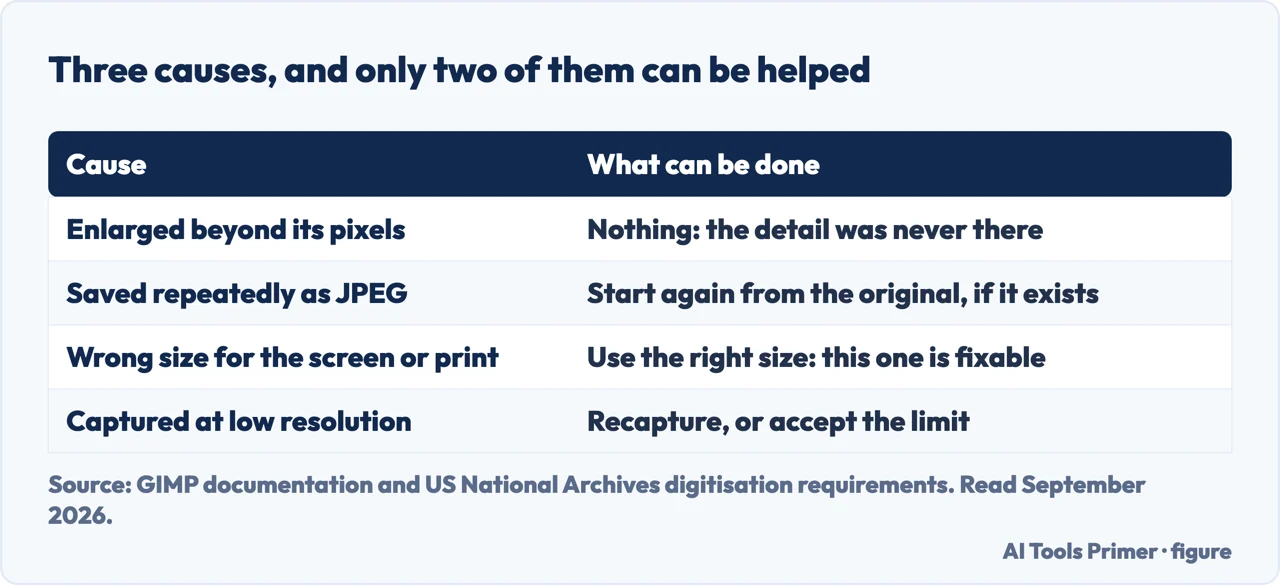
The same appearance has more than one cause, and only some of them are in the file. Sorting out which one you have is the whole job, because two of the three are fixable and the third is not.
Where an image is, in GIMP’s words
“An image can be located in one of four places” — and “pixelated” can be a fact about any of them.
That four-way split is a useful piece of thinking to borrow, because “this photo is pixelated” is a statement about how something looks, and the look can come from any of those places. A picture that is perfectly sound in its file can be pixelated on a screen simply by being shown larger than it is.
Shown too large
nothing wrong with the fileA small picture stretched across a big screen, or zoomed in. The pixels are fine; there are just fewer of them than the space. Shrink the display, not the image.
Enlarged and saved
the damage is now in the fileSomebody scaled it up and kept the result — the way not to is on the page about resizing an image in GIMP. GIMP: “The more you enlarge an image, the more blurred it becomes.” Go back to the original if one exists.
Genuinely low resolution
the honest caseThe picture never had the detail. No amount of scaling puts it there — and GIMP says so in the plainest terms in its own manual.
The first case is the cheerful one, and it is worth ruling out before touching anything. If the image looks fine at a smaller size on screen, the file is fine and the problem is presentation: a container too wide, a zoom too far in, a slideshow filling a display the picture was never sized for. Nothing needs editing.
The second and third look identical and are not. Both give you a file without enough detail — but in the second, a better version existed at some point. That makes the first move the same in both cases and free to try: go looking for the original. The copy in a message thread, the version still on the camera, the upload before the platform resized it.
If there is no original, you arrive at the question people are really asking, and GIMP answers it in its own manual, in one sentence.
“No matter which interpolation algorithm is used, no new information is added to the image by interpolation. If there are places in the layer which have no details, you will not get any new ones by scaling it.”
That is the official GIMP manual, and it is the sentence this whole question turns on. Making an image bigger is arithmetic performed on the pixels that exist: the program works out plausible values for the gaps between them. It is not looking at the thing that was photographed. Detail that was never captured cannot be recovered, only guessed at — and the manual adds the likely outcome of trying: “It is much more likely that the layer will look somewhat blurred after scaling.”
It is worth sitting with what that rules out, because it is a lot. It rules out fixing a pixelated photograph by making it bigger. It rules out the idea that a better algorithm would have worked — the manual says no matter which one. And it explains the disappointment of the obvious attempt: enlarging does something, the something is blur, and blur is not detail.
What it does not rule out is the opposite direction. Reducing an image is documented as having a cost too — GIMP says quality is lost when pixels are dropped — but the result of showing a small image at its own size is a sharp small image. If the picture only needs to be small, that is a complete fix — and it is a real one, even though it works by lowering the requirement rather than by improving the file.
“If you want to change the printing size without scaling the image and changing the number of pixels…”
GIMP treats these as two separate operations, and the distinction rescues a common case. A photograph that prints badly at a large size does not necessarily need resampling — it may need its resolution changed, which alters how many of the existing pixels are packed into each inch of paper without inventing any new ones. Blurring an image to make it print bigger is the thing to avoid; redistributing the pixels it already has is not the same operation.
A related point on the same page is worth knowing before you enlarge anything for a practical reason: GIMP warns that scaling changes “the number of pixels (the amount of information) the image contains, so it directly affects the amount of memory the image needs (in RAM or in a file)”. Past a size set in the preferences — the default is 128 MiB — “you are warned and asked to confirm the operation”. So an enlargement that fixes nothing can still cost you a much larger file.
Where this page’s evidence stops. Everything quoted above is about interpolation — arithmetic on neighbouring pixels. A tool that produces detail which was not in the file is doing something other than interpolation: it is generating it. That is a different operation, and GIMP’s sentence is not a verdict on it. Nor is this page: the site does not publish judgements on tools it has not run against real work for long enough to have one. What can be said is narrower and still useful — anything that adds detail is adding invention, and whether invented detail is acceptable depends entirely on what the picture is for. On a decorative background, fine. On a photograph of a person, a document or a number plate, that is a different question and worth asking deliberately.
The practical order that falls out of all this is short. Check whether it is only the display. Then look for an original. Then decide whether the picture can simply be used smaller. Only after those three is it worth reaching for anything that changes the pixels themselves — and by then you will know what you are trading.
Where the hard limit is written down as a number. The US National Archives sets minimum capture resolutions for digitising records: “a minimum resolution of 300 pixels per inch must be used” for modern textual paper, and “for photographic prints and paper records that have fine details, a minimum of 400 ppi sized to the source document is required, but it may be necessary to apply a higher resolution than the minimum”. Read backwards, that is the whole of this page: detail is captured or it is not, the number is decided at capture, and nothing applied afterwards puts back what was never recorded.
The guides below take it three ways: what pixels are and where they live, the tools that change them, and the neighbouring questions about images you did not take yourself.
Three ways in, and the first one costs nothing to check.
A file, a screen and a sheet of paper are three different places, and the same picture can be fine in one and poor in another. Ruling out the display costs nothing.
Interpolation calculates values for the gaps between pixels. GIMP states plainly that this adds no information, whichever method is used.
Print size depends on resolution as well as pixel count, and GIMP keeps the two operations separate. Changing one need not damage the other.
Not covered here. It will not tell you enlarging fixes a pixelated photograph. GIMP’s manual says no interpolation method adds information, and no page can argue with the program’s own documentation about what the program does.
It will not name a tool that recovers lost detail. Anything that appears to is generating detail rather than recovering it, and that is a different claim than the one being searched for.
And it will not judge the tools that make that claim. Testing them properly means running them against work that matters, which this site has not done, and an untested opinion is worth less than saying so. What holds instead is simple: the hard limit on this page is the GIMP manual’s own sentence about what enlarging cannot add, not this page’s opinion of it.
Five edits you make to an image between taking it and sending it.
Written by Alberto Gulotta
Founder and editor of AI Tools Primer, writing from Palermo, Italy. Thirty-five years of taking computers apart, starting with a Commodore 64 — the long version is on the about page.
Something wrong on this page? Write to aitoolsprimer@gmail.com and it gets fixed.
Written on 22 August 2026 · last checked 23 September 2026.
Independence and limits
No affiliate links and no paid placements anywhere on this site. Nobody pays to appear here, and no company has seen this page before you did.
This is general information, not professional advice. Where a page touches money, health, safety or the law, it names its source and the date it was read — and your situation may still differ. See the privacy page and the cookie policy.