
Apple puts unpairing on the list before the erase, not after — and the ordering is the instruction rather than a suggestion about tidiness.
Software · guide
How to reset iPhone to factory settings, and what comes first
By Alberto Gulotta · Updated · 10 min read
The reset itself is four taps. What can go wrong with how to reset iphone to factory settings is almost all in what you do before making them — and Apple sets the order out in a list that sits on a different page from the button.
Settings › General › Transfer or Reset iPhone › Erase All Content and Settings
That is the button — and it is worth noticing what it sits beside. The same Transfer or Reset iPhone screen also holds Reset Network Settings, Reset All Settings and Delete All eSIMs: narrower operations, one tap away from the irreversible one. If you came here to fix a single stubborn thing rather than to hand the phone over, the button you want is not the one below.
Now the part that matters, starting with the thing not to do.
“When you’re logged into iCloud with your Apple Account”, “manually deleting items will permanently remove them. This includes contacts, calendars, reminders, documents, and photos from iCloud servers and all your connected devices.”
Apple puts this near the top, before any instruction, and it contradicts the tidying instinct it anticipates. Do not tidy the phone up before erasing it. Deleting the photos you would rather a stranger did not see does not remove them from the phone you are selling — it removes them from your account, your iPad and your computer as well. The erase at the end handles the phone. Nothing needs deleting by hand first.
That warning is worth sitting with, because what it contradicts sounds like good sense. You are about to hand a phone to a stranger; going through the photos and messages first feels like basic care. On a device signed in to iCloud it is the opposite — every deletion propagates, and the things you removed for the sake of privacy are gone from the account you are keeping. The erase does not need help.
Apple’s order, and every step in it exists for a reason
- Back it up. First on the list, and the only step that cannot be done afterwards.
- Move your information to the new device. With iOS 11 or later that is Quick Start. And the clause people miss: “If your phone number will change with your new device, you must add additional trusted phone numbers to your account to ensure that you don’t lose access.”
- Check Parts and Service History. The step that has no equivalent on any reset screen: “If a part has Finish Repair next to it, you need to finish that repair before you can trade in your device.”
- Unpair the Apple Watch, if one is paired.
- Deal with AppleCare. Apple offers both: cancel the plan, or transfer it to the new owner. It is worth knowing the second exists before cancelling by reflex.
- Sign out of iCloud, and on a non-Apple destination, deregister iMessage.
- Erase All Content and Settings — the actual reset, and the last thing you do.
- Remove the device from your list of trusted devices. After the erase, and unprompted, because the phone is no longer in front of you.
Three of those eight appear on none of the reset screens, which is what leaves them unprompted.
Apple’s condition is specific: if you are switching to a non-Apple phone, deregister it. Only that case, and it is a step on its own rather than part of signing out.
Apple’s note: “If you aren’t using a SIM card with your device, you can contact your carrier to get help transferring service to the new owner.”
Apple’s list is about the phone. A second list, from the UK’s National Cyber Security Centre, is about everything the phone was holding open for you, and none of its items is on a reset screen. It asks for three checks before the erase. That you know the accounts you reach without typing a password each time: “make sure you know which accounts you access (and the logins and passwords for each of these accounts) before you erase your data”. That anything in the house the phone controls — it names “security cameras or thermostats” — can be managed from a different device. And that the codes that arrive by text can arrive somewhere else: “if you use your device to verify your online accounts (for example, by confirming SMS codes), you’ll need to make sure this works on another device”.
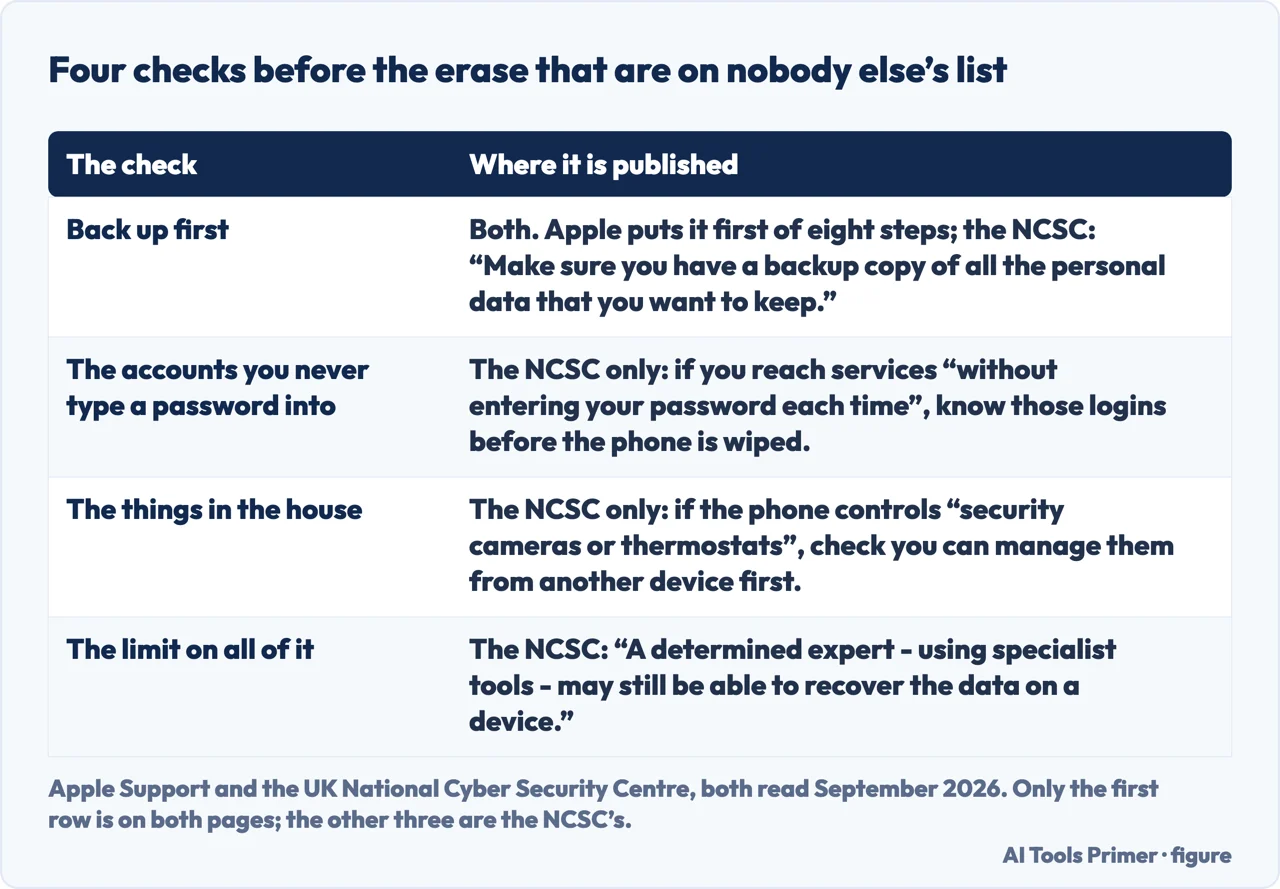
The same page states the ceiling on every instruction of this kind, and it is worth having in mind before deciding what to do with a particular phone: “A determined expert - using specialist tools - may still be able to recover the data on a device.” For a handset going to a relative or a trade-in desk that is a footnote. For one that held something a stranger could use, it is the sentence that decides whether it is sold at all.
The AppleCare step deserves a line of its own because it is money. Apple presents two options — cancel the plan, or transfer it to the new owner. Both are documented, both take a few minutes, and the outcome neither option leads to is discovering months later that you are still paying for cover on a phone in somebody else’s pocket.
And one screen where the wording has changed and matters. Signing out of iCloud in iOS 26 or later does not just sign you out: Apple says you “choose Erase this [Device] or Sign Out But Don’t Erase.”
Two buttons, two outcomes, and one of them leaves things behind — Apple links to a separate page on “what data stays on your device when you choose Sign Out But Don’t Erase.” On a phone you are handing to somebody else, that is not the button. On earlier versions the same screen simply asks for the Apple Account password and offers Turn Off.
The last step on the list is the one that happens after the phone has left. Remove the old device from your list of trusted devices. Until you do, a machine you no longer own is still named on your Apple Account as somewhere codes can go. It is the last step on Apple’s list, and it happens somewhere other than the phone.
A word on the version of this question that is really a different question. If the phone is not yours, or you cannot get past a passcode or an Apple Account you did not set up, none of the above applies and no page can help. Activation Lock is doing what it was built to do, and the route runs through the person whose account it is. That is not this guide being unhelpful: it is the lock doing the job it exists for.
The guides below take it four ways: the tidying that must not happen, the order of the eight steps, the three that get left out, and what to do when the phone is already gone.
Where to start
Four ways in.
- “I was about to delete my photos first.”
- Start at do not tidy first
- “What order do I do this in?”
- Go to the eight steps
- “I have already handed it over.”
- That is after it has gone
Do not tidy first
Cleaning a phone before erasing it is exactly wrong on an account signed in to iCloud. Apple says so above the instructions.
The eight steps
Apple’s own sequence. The erase is the seventh of them, which is the point — almost everything that matters happens before you tap it.
After it has gone
Two steps that happen once the phone is out of your hands, and one situation where none of this is available at all.
Not covered here. It will not tell you to delete your photos before selling the phone. Apple’s own warning is that on an iCloud account those deletions follow you home.
It will not describe a way past Activation Lock. It exists to make a phone worth less to somebody who took it, and it does that job.
And it will not treat the erase as the whole task. It is the seventh of Apple’s eight steps, and the ones on either side of it are where the trouble is. What holds instead is simple: every step of the eight-step order, and Apple’s warning about deletions propagating, is quoted from Apple’s own documentation.
Sources
- Apple Support — What to do before you sell, give away, or trade in your iPhone or iPad (the warning that manually deleting items while signed in to iCloud removes them from iCloud servers and all connected devices, the ordered list of steps, the trusted phone numbers note, the Parts and Service History and Finish Repair check, unpairing an Apple Watch, cancelling or transferring AppleCare, the iOS 26 sign-out choice between Erase this Device and Sign Out But Don’t Erase, deregistering iMessage when switching to a non-Apple phone, the Settings route to Erase All Content and Settings, the carrier note about service, and removing the device from your trusted devices) — support.apple.com, read 22 August 2026.
- National Cyber Security Centre (UK) — Buying, selling and donating second-hand devices (the four checks to make before erasing a device: keeping a backup of the personal data you want to keep; knowing which online services you reach without entering a password each time, and their logins; being able to manage smart devices such as security cameras or thermostats from a different device; and checking that account verification by SMS code works on another device. Also that the option to keep your personal files must not be chosen when selling, trading in or giving a device away, and that a determined expert using specialist tools may still be able to recover the data on a device) — www.ncsc.gov.uk, read 6 September 2026.
Written by Alberto Gulotta
Founder and editor of AI Tools Primer, writing from Palermo, Italy. Thirty-five years of taking computers apart, starting with a Commodore 64 — the long version is on the about page.
Something wrong on this page? Write to aitoolsprimer@gmail.com and it gets fixed.
Written on 22 August 2026 · last checked 23 September 2026.
Independence and limits
No affiliate links and no paid placements anywhere on this site. Nobody pays to appear here, and no company has seen this page before you did.
This is general information, not professional advice. Where a page touches money, health, safety or the law, it names its source and the date it was read — and your situation may still differ. See the privacy page and the cookie policy.