
Software · guide
How to split screen on Mac, with Split View or tiled windows
By Alberto Gulotta · Updated · 15 min read
How to split screen on Mac: hold the pointer over the green button at the top left of a window, choose Full Screen › Left of Screen or Right of Screen, then click the second app. That is Split View in Apple’s guide for macOS 15 to 27; Window › Move & Resize tiles two windows instead.
| What | How | Page and version read |
|---|---|---|
| Split View | Green button › Full Screen › Left of Screen or Right of Screen, then click the second app | Use apps in Split View, macOS 15, 26 and 27 |
| Split View on macOS 14 | Green button › Tile Window to Left of Screen or Tile Window to Right of Screen | Use apps in Split View, macOS Sonoma 14 |
| Two windows side by side | Window › Move & Resize › Left & Right, or Fn-Control-Shift-Left Arrow | Tile windows; Mac window tiling icons & keyboard shortcuts, macOS 15 and 27 |
| One window to a half | Drag it to the left or right edge, or Fn-Control-Left Arrow or Right Arrow | The same two pages |
| Split View on a second display | Displays have separate Spaces turned on in Desktop & Dock settings | Use apps in Split View, macOS 14 to 27 |
| Tiling options on or off | System Settings › Desktop & Dock › Windows | Change window tiling settings, macOS 27 |
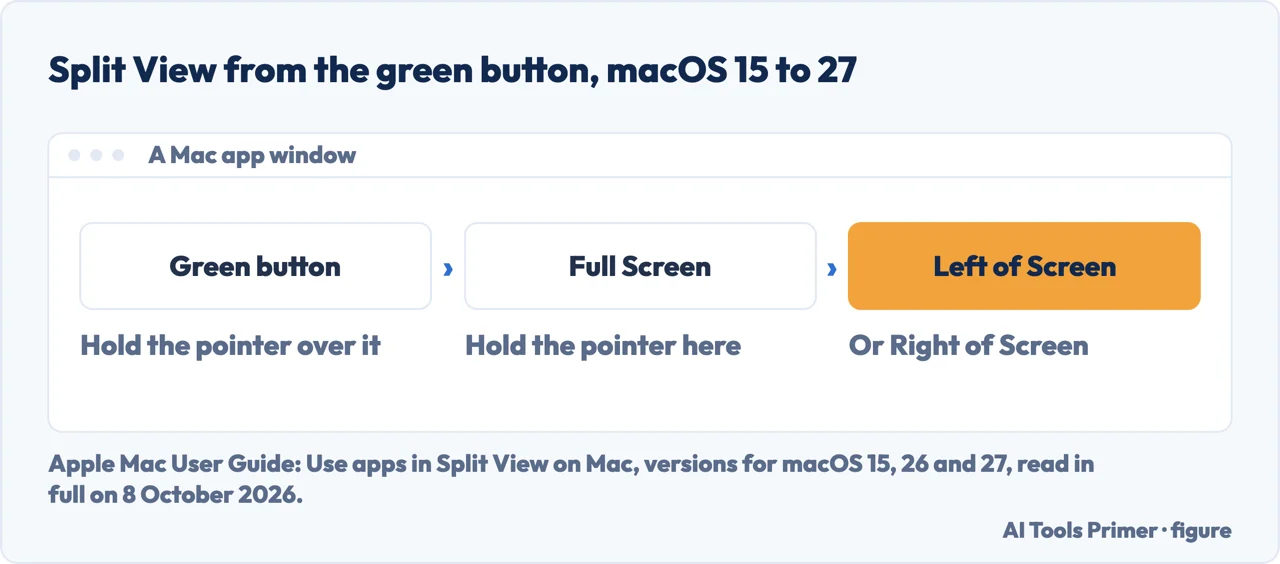
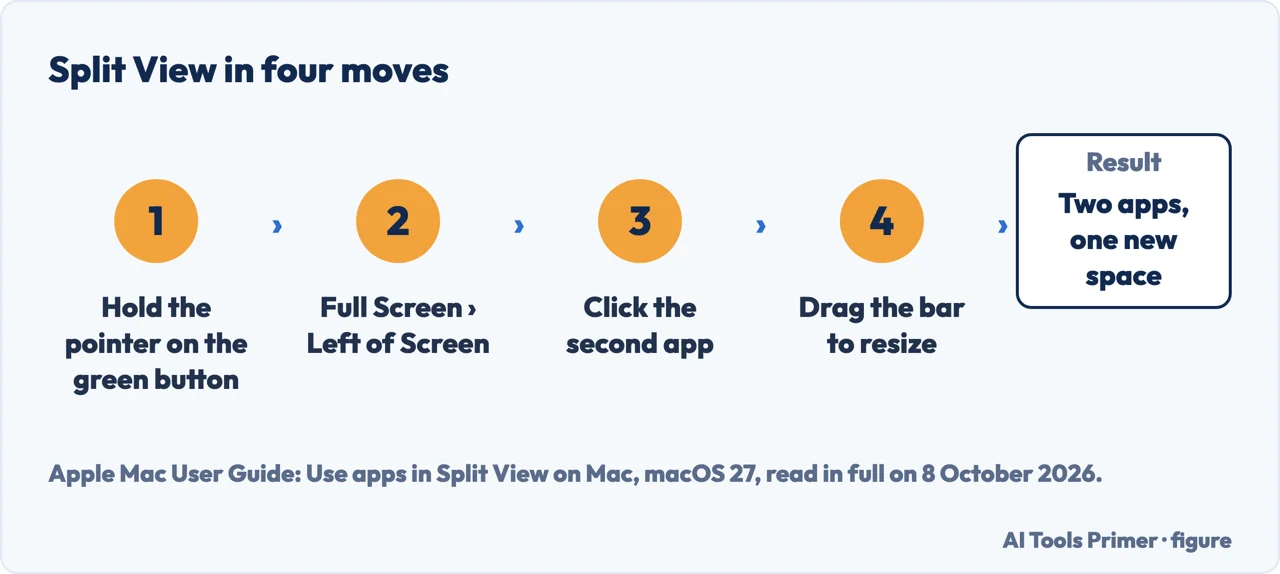
- Hold the pointer over the green button. It is the green button in the top-left corner of the window you want on one side. Apple’s instruction is to hold the pointer there; by our reading, not to click it: a click on the green button, by Apple’s page on full screen, puts the app into full screen on its own.
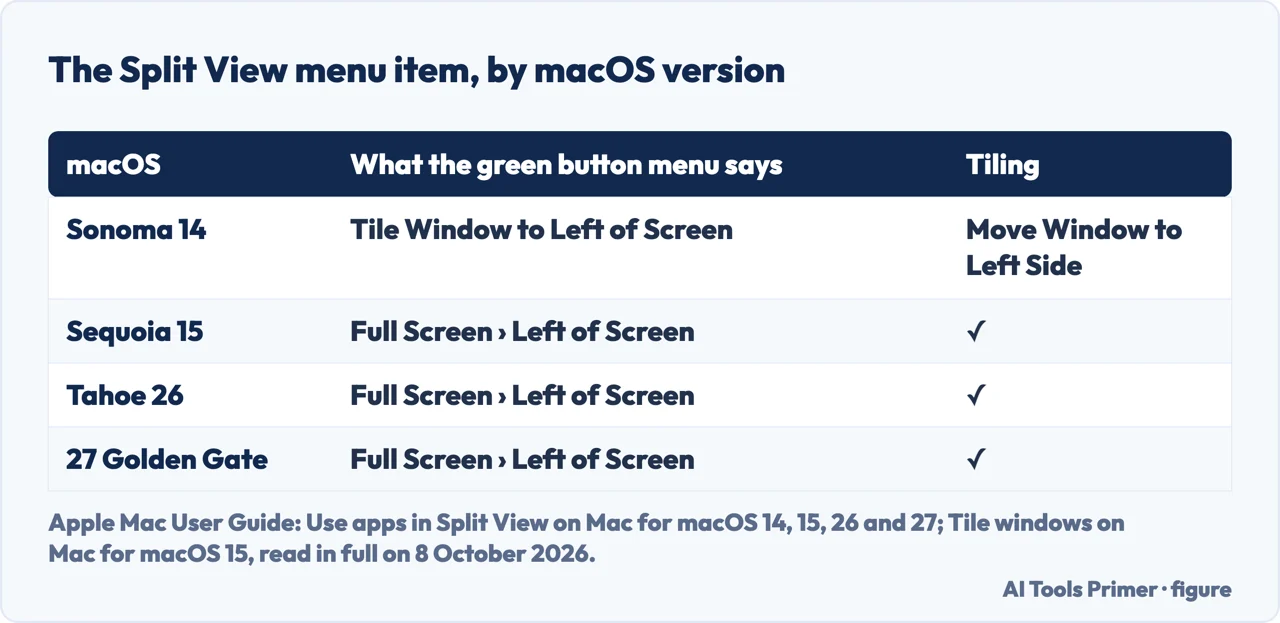
- Choose Full Screen › Left of Screen or Right of Screen. These are the names in the Mac User Guide for macOS Sequoia 15, Tahoe 26 and macOS 27. On macOS Sonoma 14 the same page names them Tile Window to Left of Screen and Tile Window to Right of Screen.
- Click the second app on the other side of the screen. Apple adds that the Split View is created in a new desktop space.
- Drag the separator bar to give one side more room. It sits in the middle; Apple says a double-click on the bar returns both sides to their original sizes.
Split View or tiled windows
Apple’s guide has two pages, and both put two apps side by side. Split View, by our reading, is a full-screen mode: the pair moves to a space of its own, the menu bar shows when the pointer moves to the top of the screen, and the Dock when it moves to the Dock’s location. Apple adds that the menu bar is always shown if the option to hide and show it in full screen has been turned off.
Tiling, in macOS Sequoia 15 or later. On macOS Sonoma 14, Apple’s page Move and arrange app windows on Mac gives a half-screen route without full screen: hold Option while the pointer is over the green button, then choose Move Window to Left Side of Screen or Move Window to Right Side of Screen; the menu bar and Dock remain visible. From Sequoia 15, Apple’s page Tile windows on Mac lists five ways: drag the window to the edge of the screen, press Option while dragging, use the green button, use the Window menu, or use keyboard shortcuts. The Sequoia 15 version of the page opens with “In macOS Sequoia 15 or later”, and its shortcut page says window tiling is available in macOS Sequoia 15 or later.
The choice, by our reading of the two pages: Split View for two apps and nothing else on the screen; tiling to keep the Dock, the menu bar and other windows in reach. Apple’s Split View page speaks of two apps; its tiling table also has layouts for three and four windows, such as Quarters and Left & Quarters.
Tiling two windows without full screen
Drag to an edge. Drag a window to the left or right edge, or a corner, and release it when the highlighted area appears; Apple says the window snaps into position when the pointer reaches the edge. Dragging it to the menu bar fills the desktop.
Option while dragging. For faster tiling, Apple says to press and hold Option and drag the window toward the edge or corner you want, then release it in the highlighted area.
The green button. Hold the pointer over it and the menu shows layouts under Move & Resize for the active window and under Fill & Arrange for several windows; pressing Option shows more layouts. The same menu holds Full Screen, which is where Split View starts.
The Window menu. With the window active, choose Window › Move & Resize and pick a layout under Halves or Quarters for one window, or under Arrange for several. Window › Center and Window › Fill are in the same menu, and Full Screen Tile holds the Split View choices.
When dragging does nothing. The drag options can be turned off. Apple’s page on tiling settings lists four switches under System Settings › Desktop & Dock › Windows: Drag windows to left or right edge of screen to tile, Drag windows to menu bar to fill screen, Hold ⌥ key while dragging windows to tile, and Tiled windows have margins. Dragging a window through the top edge opens Mission Control unless Drag windows to top of screen to enter Mission Control is turned off in Desktop & Dock settings.
Keyboard shortcuts
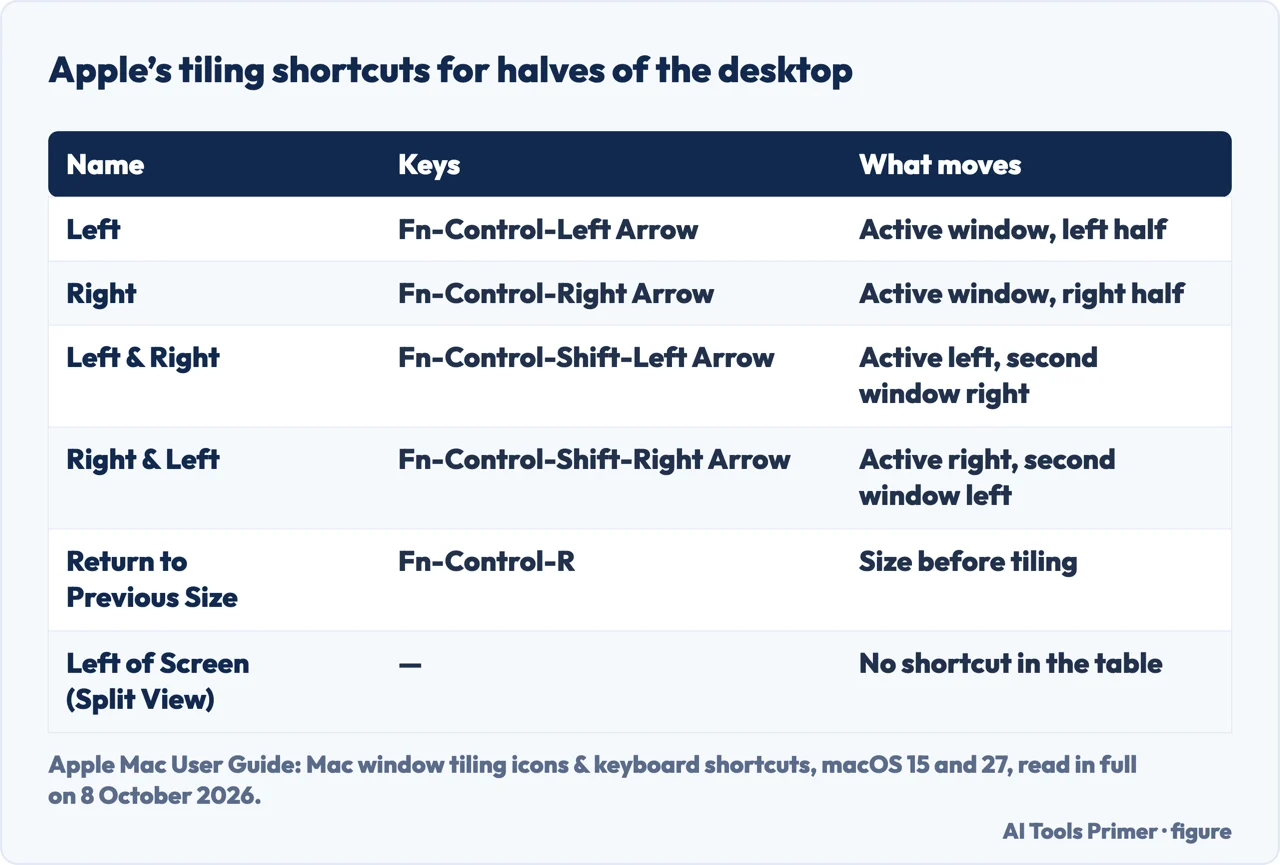
Apple’s table Mac window tiling icons & keyboard shortcuts gives every key with Fn and Control. Fn-Control-Left Arrow and Fn-Control-Right Arrow move the active window to the left or right half of the desktop. Fn-Control-Shift-Left Arrow, named Left & Right, moves the active window to the left half and the second window to the right half; Fn-Control-Shift-Right Arrow does the opposite. Fn-Control-F fills the desktop, Fn-Control-C centres the window, and Fn-Control-R returns it to the size it had before it was tiled.
Split View itself has no shortcut in that table. The rows Left of Screen and Right of Screen under Full screen tile show n/a in the shortcut column, and so do Entire Screen and Exit Full Screen. The four corners and Quarters have no key either. The macOS 15 and macOS 27 versions of the table give the same keys.
Inside Split View, Control-Up Arrow opens Mission Control, which is how Apple’s page returns to an app after a window leaves the pair; swiping up with three or four fingers does the same.
Working inside Split View
Change sides. Drag a window by its title and toolbar to the other side.
Swap one app. Click the window, hold the pointer over the green button, choose Replace Tiled Window, then click the window to use instead. Clicking the desktop cancels.
Take one app out. From the same green button, Move Window to Desktop puts that app back on the desktop, and Make Window Full Screen gives it a full screen of its own. Either way, Apple says the app that stayed is now full screen in its own space.
Start from an app already in full screen. Press Control-Up Arrow to enter Mission Control, drag a window onto the thumbnail of the full-screen app in the Spaces bar, then click the Split View thumbnail. Apple’s page on spaces adds that dragging a window onto a full-screen app in the Spaces bar is a way into Split View, and that the Exit button on a thumbnail in the Spaces bar stops full screen or Split View.
Why split screen can stop working
The menu item has a new name. On macOS Sonoma 14, Apple’s Split View page says to choose Tile Window to Left of Screen or Tile Window to Right of Screen from the menu on the green button. From Sequoia 15 the same page says Full Screen › Left of Screen or Right of Screen. After an update, the old name is not where it was; that is our reading of the two versions side by side.
On a second display, a setting decides. Every version read, from 14 to 27, ends with the same condition: to use Split View on other displays, Displays have separate Spaces must be turned on in Desktop & Dock settings.
The app may not support it. Apple’s page names no list of the apps that support Split View, and none of those that do not. This guide has not tested an app without a Left of Screen choice.
Tiling switched off. If dragging a window to an edge no longer tiles it, check the switches under Desktop & Dock › Windows described above. Setapp’s guide adds two checks: that the windows are not in full-screen mode, and that the macOS version supports tiling.
A second display instead of a split
Apple’s page Connect one or more external displays with your Mac starts with three checks: which video ports the Mac has, how many displays it supports, and whether the cables match. The number is in the Mac’s specifications, under Display Support or Video Support, which Apple reaches by opening System Settings, then Help in the menu bar › [your Mac’s name] Specifications.
Once connected, System Settings › Displays decides whether the desktop is extended or mirrored across the displays. If the Mac does not see the display, Apple says to hold Option in Displays settings so that a Detect Displays button appears.
More on the Mac. Moving text between the two sides is covered in copy and paste on a Mac, and an app that stops responding inside Split View has its own steps in force quitting on a Mac.
Where to start
Six ways in.
- “Just give me the steps.”
- Split View in four steps — the steps for split view
- “I want to keep the Dock.”
- Tiling instead — tiling two windows
- “Is there a key for it?”
- Fn and Control — keyboard shortcuts
- “How do I swap one side?”
- Inside Split View — working inside split view
- “The option is gone.”
- Four reasons — why split screen stopped working
- “I have a second monitor.”
- Displays first — two displays
More on the Mac
Other everyday Mac jobs, each with a guide of its own.
Questions people also ask
What is the shortcut for split screen on Mac?
Apple’s tiling table gives Fn-Control-Shift-Left Arrow for Left & Right: the active window takes the left half of the desktop and the second window the right. Fn-Control-Left Arrow or Right Arrow moves one window to a half. Split View itself, Left of Screen and Right of Screen, has no shortcut in that table.
How to view 2 pages side by side in Mac?
Apple’s guide for macOS 27 gives two ways. Split View: hold the pointer over the green button, choose Full Screen › Left of Screen, then click the second window. Or tile them on the desktop with Window › Move & Resize › Left & Right: the active window goes left, the second right.
How to make a Mac dual screen?
Connect a second display. Apple says to check the Mac’s video ports, how many displays it supports (Display Support in its specifications) and the cables. Then System Settings › Displays sets the desktop to extend or mirror. For Split View on that display, Displays have separate Spaces must be on in Desktop & Dock settings.
Why can’t I split screen on my Mac anymore?
Apple’s guide names the item by version: for macOS Sonoma 14 it says Tile Window to Left of Screen, and from Sequoia 15 Full Screen › Left of Screen. On another display, Displays have separate Spaces must be on. And the app itself may not support Split View: Apple does not list which apps do.
Not covered here. It does not cover Stage Manager, which has a page of its own in Apple’s guide, or the iPad.
Nor does it cover window apps from outside Apple; every route above is from Apple’s Mac User Guide, apart from Setapp’s two checks, and the macOS version of each page is named in the table, the figures or the Sources.
Sources
- Apple Mac User Guide — Use apps in Split View on Mac, macOS 27: the green button, Full Screen, Left of Screen or Right of Screen, the new desktop space, the separator bar, Replace Tiled Window, Move Window to Desktop, and Displays have separate Spaces — support.apple.com, read 8 October 2026.
- Apple Mac User Guide — Use apps in Split View on Mac, macOS Tahoe 26: the same steps as macOS 27 — support.apple.com, read 8 October 2026.
- Apple Mac User Guide — Use apps in Split View on Mac, macOS Sequoia 15: Full Screen, Left of Screen or Right of Screen — support.apple.com, read 8 October 2026.
- Apple Mac User Guide — Use apps in Split View on Mac, macOS Sonoma 14: Tile Window to Left of Screen or Tile Window to Right of Screen — support.apple.com, read 8 October 2026.
- Apple Mac User Guide — Move and arrange app windows on Mac, macOS Sonoma 14: Option over the green button, Move Window to Left Side of Screen or Right Side of Screen — support.apple.com, read 8 October 2026.
- Apple Mac User Guide — Tile windows on Mac, macOS 27: the five ways to tile, Move & Resize, Fill & Arrange, the Window menu, and dragging through the top edge — support.apple.com, read 8 October 2026.
- Apple Mac User Guide — Tile windows on Mac, macOS Sequoia 15: In macOS Sequoia 15 or later — support.apple.com, read 8 October 2026.
- Apple Mac User Guide — Mac window tiling icons & keyboard shortcuts, macOS 27: the Fn-Control keys, and n/a for the full screen tile rows — support.apple.com, read 8 October 2026.
- Apple Mac User Guide — Mac window tiling icons & keyboard shortcuts, macOS Sequoia 15: window tiling is available in macOS Sequoia 15 or later, and the same keys — support.apple.com, read 8 October 2026.
- Apple Mac User Guide — Change window tiling settings on Mac, macOS 27: the four switches under Desktop & Dock, Windows — support.apple.com, read 8 October 2026.
- Apple Mac User Guide — Use apps in full screen on Mac, macOS 27: a click on the green button enters full screen — support.apple.com, read 8 October 2026.
- Apple Mac User Guide — Work in multiple spaces on Mac, macOS 27: dragging a window onto a full-screen app in the Spaces bar, and the Exit button — support.apple.com, read 8 October 2026.
- Apple Mac User Guide — Connect one or more external displays with your Mac, macOS 27: ports, Display Support, cables, extend or mirror, and Detect Displays — support.apple.com, read 8 October 2026.
- Setapp — Mac snap windows: How to use macOS Split View for productivity, the seventh search result on 7 October 2026: the two checks when tiling does not work — setapp.com, read 8 October 2026.
Written by Alberto Gulotta
Founder and editor of AI Tools Primer, writing from Palermo, Italy. Thirty-five years of taking computers apart, starting with a Commodore 64 — the long version is on the about page.
Something wrong on this page? Write to aitoolsprimer@gmail.com and it gets fixed.
Written on 8 October 2026.
Independence and limits
No affiliate links and no paid placements anywhere on this site. Nobody pays to appear here, and no company has seen this page before you did.
This is general information, not professional advice. Where a page touches money, health, safety or the law, it names its source and the date it was read — and your situation may still differ. See the privacy page and the cookie policy.