
Audio · guide
How to remove background noise from audio, and what stays
By Alberto Gulotta · Updated · 17 min read
To remove background noise from audio that is steady, such as hiss, hum or air conditioning, Audacity and Adobe Audition share one method: show the program a stretch of noise alone, then filter. Pro Tools uses a spectral editor, browser services set limits by plan, and a one-off sound like a door slam is treated differently.
| Question | Answer | Where it comes from |
|---|---|---|
| What do I record first? | 10 or 20 seconds of the empty room, heard through headphones | Rev |
| How does Audacity do it? | Two steps: get a noise profile from noise alone, then filter the audio | Audacity Manual |
| What kind of noise does it suit? | Constant noise; the manual says it will not remove a door slam | Audacity Manual |
| What does a browser service limit? | Adobe’s free plan: 30 minutes a file and 1 hour a day, audio only | Adobe Podcast |
| Does the filter have a cost to the voice? | Pushed too far it leaves metallic, watery artefacts | Audacity Manual |
Before any filter, listen to the room
Rev’s guide starts before the software. It says to set up your equipment as you would for the final recording, take a 10- or 20-second recording of the empty space and listen to it with headphones, noting anything you hear: the air conditioner, an electrical hum, kids in the next room. The fixes it names follow from that list. Turn off the air conditioner during the interview. If you hear a hum, the equipment may share a circuit with a demanding appliance, so try a different outlet or shut off other equipment. For echo, add sound-absorbing materials such as curtains, a soft chair or a blanket over hard surfaces. It also says a close microphone helps, with a pop filter to catch the gusts of air from p sounds.
The Podcast Host makes a related point for Audacity users: leave 10 to 15 seconds of silence at the start of each recording, which makes the noise-profile step quicker and easier. Both pages are written by companies that sell something, Rev transcription and The Podcast Host its Alitu podcast app, and we use them only for the steps they describe.
If the recording is already on a phone or computer, Rev says you may be able to adjust the settings on the recording to help remove background sound, and that many newer devices “are pretty good at isolating voices” while recording but are not perfect. It names the Voice Memos app on iPhone and Mac, which has an Enhance Recording option, and a Noise Suppression option in the Hardware and Sound section of the Windows Control Panel on some computers. The Rev page shows no date in the text we read. Apple’s iPhone User Guide describes Enhance Recording as a way to reduce background noise and echo when you play Mono and Stereo recordings: tap the recording, open its menu, tap Options, turn on Enhance Recording, then play it. The page says “when you play”, and it does not say whether the saved file changes. Our page on recording audio on iPhone covers Voice Memos from the first tap.
The noise profile in Audacity
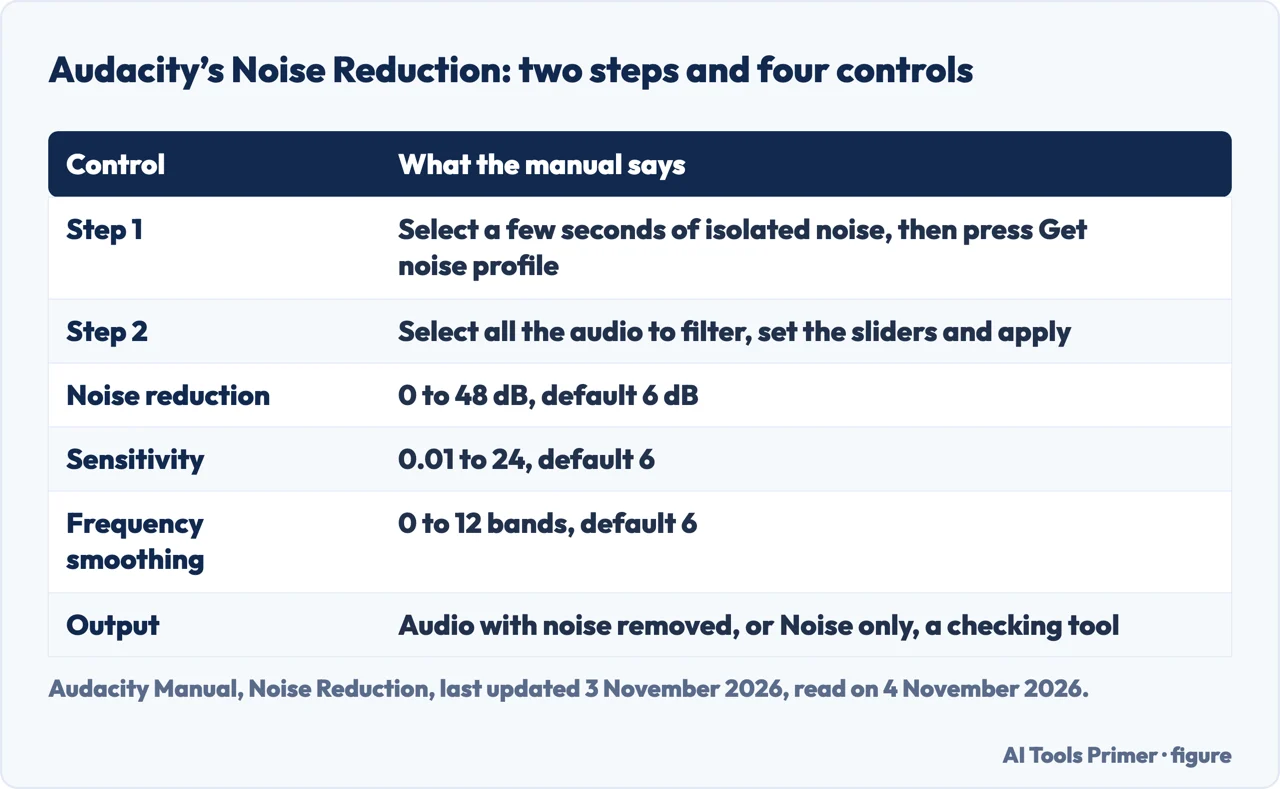
The Audacity Manual page for Noise Reduction, last updated on 3 November 2026, says the effect works in two passes. First you show it a stretch of the recording that contains only the noise, such as hiss, hum or air conditioning, so it can learn the spectrum you want gone. Then you select the audio to clean and apply the filter. The manual places it under Effect, then Noise removal and repair, then Noise reduction. In the dialog, step 1 is selecting a few seconds of isolated noise and pressing Get noise profile; step 2 is selecting all the audio you want filtered, setting the sliders and applying. The Podcast Host’s article, last updated on 13 February 2020, names the path as Effect, then Noise Reduction, then Get Noise Profile, so the menu wording differs between the two pages.
The manual gives the controls and their ranges. Noise reduction sets how much the noise is attenuated, from 0 to 48 dB, with a default of 6 dB. Sensitivity sets how readily a sound is judged to be noise rather than signal, from 0.01 to 24, default 6. Frequency smoothing spreads the reduction across neighbouring bands, from 0 to 12, default 6. Output offers Audio with noise removed or Noise only. The Podcast Host says the three sliders can be moved to the right to make the process more severe, and that the default settings are almost always good enough for the kinds of noise it discusses.
Two warnings come from the manual. The profile has to come from noise alone: if the selection you profile contains any of the wanted audio, that content is treated as noise too and the filter will eat into it. And Noise only is a checking tool rather than a result: apply it, listen to what is about to be removed, and if you can hear the signal (the wanted audio) in there, the manual says the settings are too aggressive, so undo and back the sliders off. Push the effect too far and you get metallic, watery artefacts; the manual says a modest reduction that leaves some noise behind “usually sounds better” than removing all of it. The Podcast Host describes the same warning sign as an “underwater” sound on the voice, which it says can be worse than the noise you started with.
The same method in Audition, and a different one in Pro Tools
Adobe’s help page for Audition describes the same two-step idea for its Noise Reduction effect, which works in the Waveform Editor and not in the multitrack view. You select a range that contains only noise and is at least half a second long, then choose Effects, Noise Reduction/Restoration, Capture Noise Print, then select the audio and apply Noise Reduction. If the selected range is too short, Capture Noise Print is disabled, and the page says to reduce the FFT Size or select a longer range. Adobe says the effect can remove a combination of noise, including tape hiss, microphone background noise, power-line hum or any other constant noise throughout a waveform. It also says a print for one type of noise will not produce good results with other types.
Adobe puts numbers on the settings. In Reduce By, values between 6 and 30 dB work well, and lower values reduce bubbly artefacts. Spectral Decay Rate works best between 40% and 75%. Excessively high noise reduction levels can make audio sound flanged or out of phase. The page says that in general you can increase the signal-to-noise ratio by 5 to 20 dB and keep high audio quality.
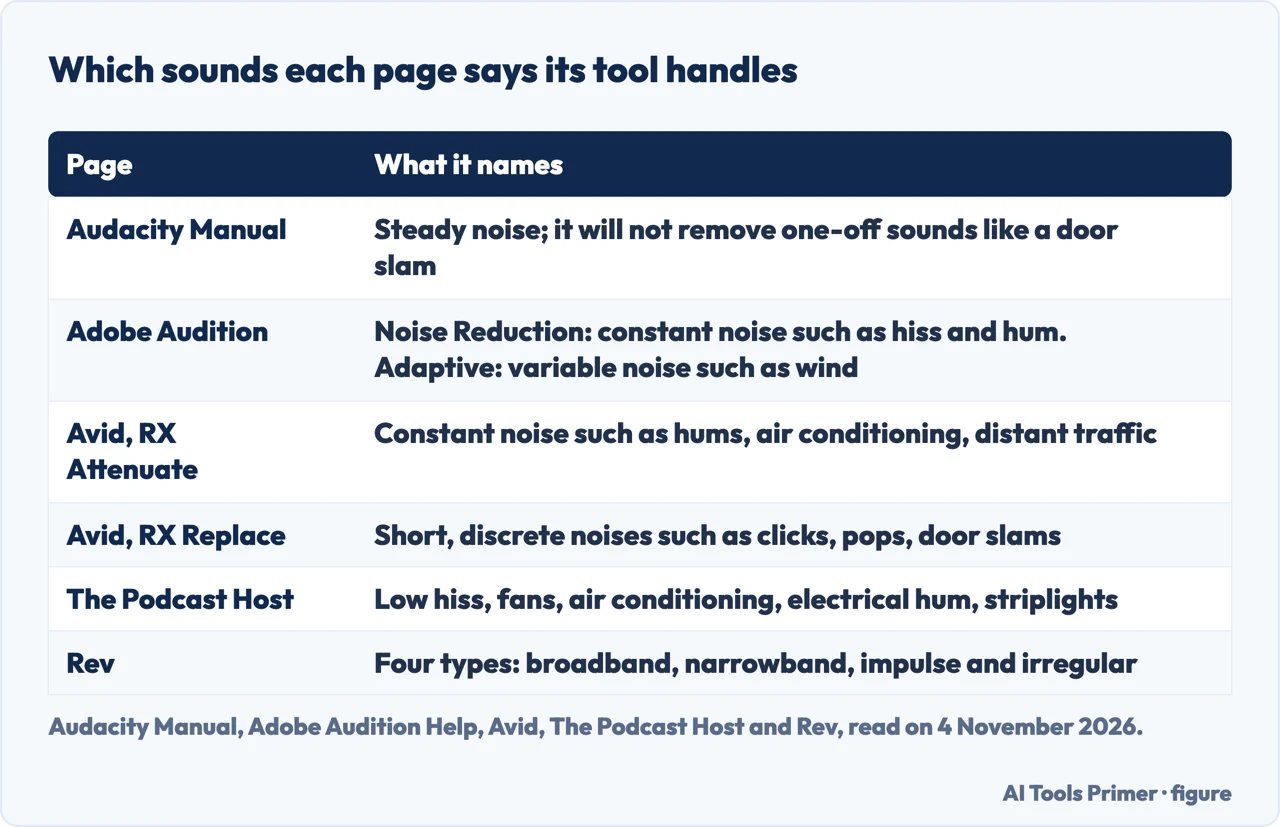
Avid’s guide takes a different route. In Pro Tools it uses the RX Spectral Editor from iZotope, reached through ARA2 and included with Pro Tools Artist, Studio and Ultimate. You mark the sound on a spectral display with a paintbrush, a lasso or a magic wand, then choose a repair mode. Attenuate blends the selection into the background and, Avid says, suits constant noise such as hums, air conditioning or distant traffic. Replace fills the selection with the surrounding material and suits short, discrete noises such as clicks, pops and door slams. Both modes share Process Strength, Region Size, Weighting and Direction controls, and the editor also has De-click and De-hum tools.
This is where two pages seem to disagree. The Audacity Manual says its Noise Reduction will not remove one-off sounds like a door slam; Avid says Replace in RX is suited to door slams. They describe different tools, a profile filter on one side and a spectral editor on the other, and neither page compares them. Rev’s guide sorts noise into four types: broadband (hiss or buzz), narrowband (a hum from a poorly grounded circuit), impulse (pops and crackles) and irregular (rain on the window, a neighbour through the wall). It lists Audacity, Audition, Krisp and iZotope RX among the tools.
The browser services and what each one limits
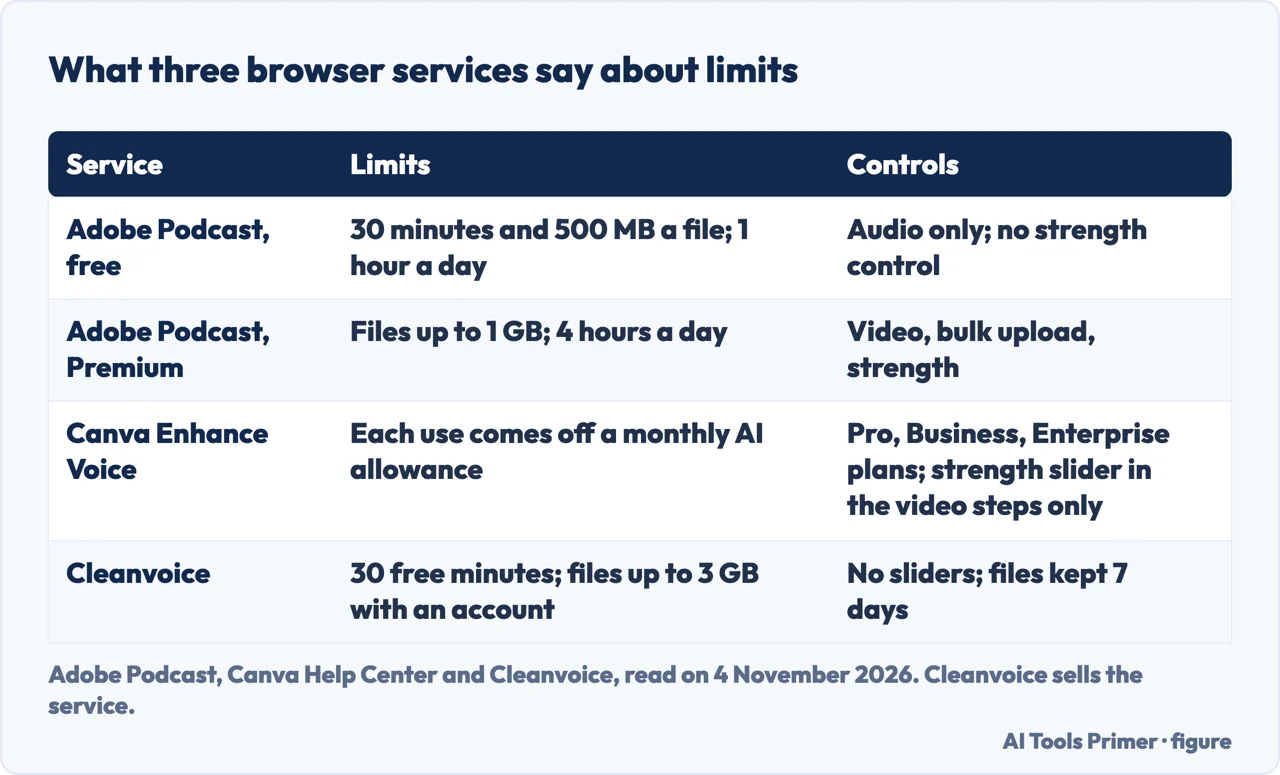
Adobe Podcast’s Enhance Speech has a free plan that is audio only, takes one file at a time and has no strength control. Its features page and its help FAQ give the free limits as files up to 30 minutes and 500 MB, with 1 hour a day. The Premium plan adds video, bulk upload and adjustable strength, with up to 4 hours a day and files up to 1 GB. The Adobe pages differ on two points. The features page also says Premium files can be up to 2 hours long, while the FAQ table gives audio a per-day figure for Premium and no per-file length. And the FAQ table gives video up to 2 hours a day, while the features page gives Premium, which includes video, 4 hours a day. The Enhance Speech page presents the Premium features inside the Adobe Firefly Pro plan. Adobe says the download comes back in the format you uploaded, that the tool does not generate or translate across languages, and that results often depend on how audible the speaker is and how much noise there is.
Canva’s help page says Enhance Voice removes background noise from video and audio, works only on material that contains voice and is available on Canva Pro, Canva Business and Canva Enterprise. For an audio file you upload it, select the track on the timeline, choose Audio Tools and switch on Enhance Voice. The strength slider appears in the video steps and not in the audio steps. Each use is deducted from the monthly AI allowance, and the page sends you to another page for the limits, which we did not read, so we give no figure and no price.
Cleanvoice sells its service, so what follows is what the seller says. It lists steady noise such as hum, hiss and fans and changing noise such as wind, traffic and chatter, and says there is no noise profile and no sliders. New accounts get 30 free minutes without a card, files can be up to 3 GB with an account, and the original and edited files are stored for 7 days. Cleanvoice warns that AI noise removal works best when the voice is louder than the noise, and that with a voice buried under very loud noise some artefacts can remain. It also says Audacity and Audition need a profile and tuning and struggle with changing noise such as wind or chatter; that is the seller’s view of competing tools.
The seller also publishes a test it ran on 1 November 2026: 100 noisy clips from Dolby’s UNIVERSE set, transcribed by an automatic transcriber. It reports word errors of 15.5% after Cleanvoice, 17.1% after Adobe Podcast, 20.3% after Auphonic, 23.8% after ElevenLabs, 25.4% after Descript and 17.0% on the unprocessed input, so in its own table only Cleanvoice came out below the unprocessed clips. By Cleanvoice’s own description it used 16 kHz audio, one dataset and one transcriber, and the results may differ on other material. One more limit comes from the same page: Cleanvoice and DeepFilterNet3 processed each clip separately, while the other products processed the 100 clips joined into one file. We treat those figures as a claim by a seller and do not rank the services on them.
Levelling the volume is a separate job
Noise removal does not set how loud the voice is, and Audacity has two effects for that. The manual says Loudness Normalisation measures how loud the selection sounds and applies one gain change to bring it to a target you choose. In perceived-loudness mode the units are LUFS and the default is −23 LUFS; in RMS mode the default is −20 dB. The manual calls −23 LUFS the EBU R 128 target and a reasonable default for spoken word intended for broadcast, and adds that the published targets of streaming platforms are usually a few LU higher.
Normalize works from the highest peak instead. The manual says it applies one gain change so that the loudest peak in the selection lands on a level you choose, with a default of −1 dB that cannot go above 0 dB. It also removes DC offset by default, and its option to treat stereo channels independently is off by default. Our reading of the phrase “one gain change” is that both effects move the whole selection up or down together, so neither would by itself bring two different voices in one recording to the same level; the manual pages do not say either way. The Podcast Host points to the Audacity compressor for levelling out volume, and says its own Alitu app cleans up audio and levels it to a consistent volume from start to finish.
What the pages say stays behind, and what we did not do
The pages agree on a boundary. Audacity’s manual and Audition’s help describe constant noise, and The Podcast Host says the voice has to be clearly audible above the noise and that a constant noise works much better than a changing one. For noise as heavy as a squadron of fighter jets flying overhead, it says a re-record might be your best option. Cleanvoice, for its part, says a voice buried under very loud noise can still leave artefacts. Rev’s fourth type, irregular noise, is the one that comes and goes. The Audacity page we read names no setting for it, but Adobe’s Audition help describes a separate Adaptive Noise Reduction effect for variable broadband noise such as background sounds, rumble and wind, which works in real time and can be used in the Multitrack Editor, and says the standard Noise Reduction is sometimes more effective on constant noise such as hiss or hum. That sets Cleanvoice’s remark that Audacity and Audition struggle with changing noise against what Adobe documents for Audition.
The pages we read do not give independent measurements of how much of the speech each method removes on real recordings. The only test results of that kind are the ones from the seller above. They do not say whether Apple’s Enhance Recording changes the saved file, and they do not settle which Premium duration Adobe means. The Adobe and Canva pages we read do not say what happens to uploaded files; Cleanvoice says 7 days. We did not check how Audacity 4 compares with earlier versions, since the manual we read is the one online on 3 November 2026.
We ran no tool on a recording and did not listen to any result, so this page ranks nothing. We did not read the pages of five online noise-removal services, a Reddit thread or a Quora question. Our page on transcribing a recording covers speech to text.
Where to start
Four ways in.
- “What do I do before filtering?”
- Before any filter, listen to the room — before
- “I use Audacity.”
- The noise profile in Audacity — audacity
- “I want it done in the browser.”
- The browser services and what each one limits — browser
- “What does it not fix?”
- What the pages say stays behind — limits
Recording it well
The room, the phone and the fan come first.
Working with the file
Audacity, vocals and transcripts.
Questions people also ask
How can I remove background noise from audio for free?
The Podcast Host calls Audacity a free, open source editor, and its manual describes the noise-profile route. Adobe Podcast has a free plan limited to 30 minutes a file and 1 hour a day, and Cleanvoice gives new accounts 30 free minutes. Apple’s Voice Memos has Enhance Recording.
Can Chatgpt remove background noise from video?
ChatGPT appears in the pages we read only in passing, in a Cleanvoice heading and a testimonial and in Apple’s menus, with no steps for noise in video. The ones that cover video are Canva Enhance Voice, on Pro, Business and Enterprise, Adobe Podcast Premium, and Cleanvoice, which lists video formats such as MP4, MOV and WebM.
How do you remove background noise from an audio file?
In Audacity, select a few seconds of noise alone and press Get noise profile, then select the audio to filter, set the sliders and apply. Audition does the same with Capture Noise Print on a range of at least half a second.
How do I remove background noise without any professional skills?
Rev suggests listening to the empty room first and checking the Enhance Recording or Noise Suppression options on the device. Canva says to switch on Enhance Voice, available on Canva Pro, Business and Enterprise, and Cleanvoice says it has no profile and no sliders.
Not covered here. We ran no tool on a recording. The statements come from the Audacity Manual, Adobe’s Audition help and Adobe Podcast pages, Avid, Canva, Apple Support, Rev, The Podcast Host and Cleanvoice, all read on 4 November 2026.
The search volume and difficulty behind this page come from a Semrush Keyword Overview reading of 4 November 2026, inside the 60 days the site normally allows.
Sources
- Audacity Manual — Noise Reduction — www.audacityteam.org, read 4 November 2026.
- Audacity Manual — Loudness Normalisation — www.audacityteam.org, read 4 November 2026.
- Audacity Manual — Normalize — www.audacityteam.org, read 4 November 2026.
- Adobe Audition Help — Applying noise reduction techniques and restoration effects — helpx.adobe.com, read 4 November 2026.
- Avid — How to Remove Background Noise from Audio in Pro Tools — www.avid.com, read 4 November 2026.
- Adobe Podcast — Features and plans — podcast.adobe.com, read 4 November 2026.
- Adobe Podcast — Enhance Speech — podcast.adobe.com, read 4 November 2026.
- Adobe Help — Frequently asked questions about Enhance Speech — helpx.adobe.com, read 4 November 2026.
- Canva Help Center — Enhance Voice — www.canva.com, read 4 November 2026.
- Apple Support — iPhone User Guide, play back a Voice Memos recording — support.apple.com, read 4 November 2026.
- Rev — How to Remove Background Noise From Audio — www.rev.com, read 4 November 2026.
- The Podcast Host — Audacity Noise Reduction: How to Remove Background Noise — www.thepodcasthost.com, read 4 November 2026.
- Cleanvoice — Remove Background Noise from Audio and Video — cleanvoice.ai, read 4 November 2026.
Written by Alberto Gulotta
Founder and editor of AI Tools Primer, writing from Palermo, Italy. Thirty-five years of taking computers apart, starting with a Commodore 64 — the long version is on the about page.
Something wrong on this page? Write to aitoolsprimer@gmail.com and it gets fixed.
Written on 4 November 2026.
Independence and limits
No affiliate links and no paid placements anywhere on this site. Nobody pays to appear here, and no company has seen this page before you did.
This is general information, not professional advice. Where a page touches money, health, safety or the law, it names its source and the date it was read — and your situation may still differ. See the privacy page and the cookie policy.