It plays
nothing is brokenApple: put both back in the case, charge 30 seconds, open the case near the phone, and test again. The AirPod works — what failed was the pairing or the charge, and the case fixes it.

Software · guide
By Alberto Gulotta · Updated · 16 min read
One AirPod not working sounds like a single complaint. In Apple’s documentation it is two, with two separate procedures, and telling them apart before you start saves undoing something that was never wrong.
Apple splits this into two problems with two different procedures: “If there’s no sound in one AirPod” and “If one AirPod is louder or quieter than the other”.
They feel like the same complaint and they are not. Silence is a connection question; quietness is a physical or a settings question, and the steps share almost nothing. Running the wrong one is how people end up resetting a pair of AirPods that were never mispaired — losing the pairing on every device signed in, to fix something that was a blocked mesh or a slider.
Take the silent case first, because Apple’s steps for it are a genuine test rather than a list of things to try — and the whole test turns on one instruction most summaries leave out.
Apple’s isolation test
Seven steps, and the sixth is the one that makes it a test rather than a checklist.
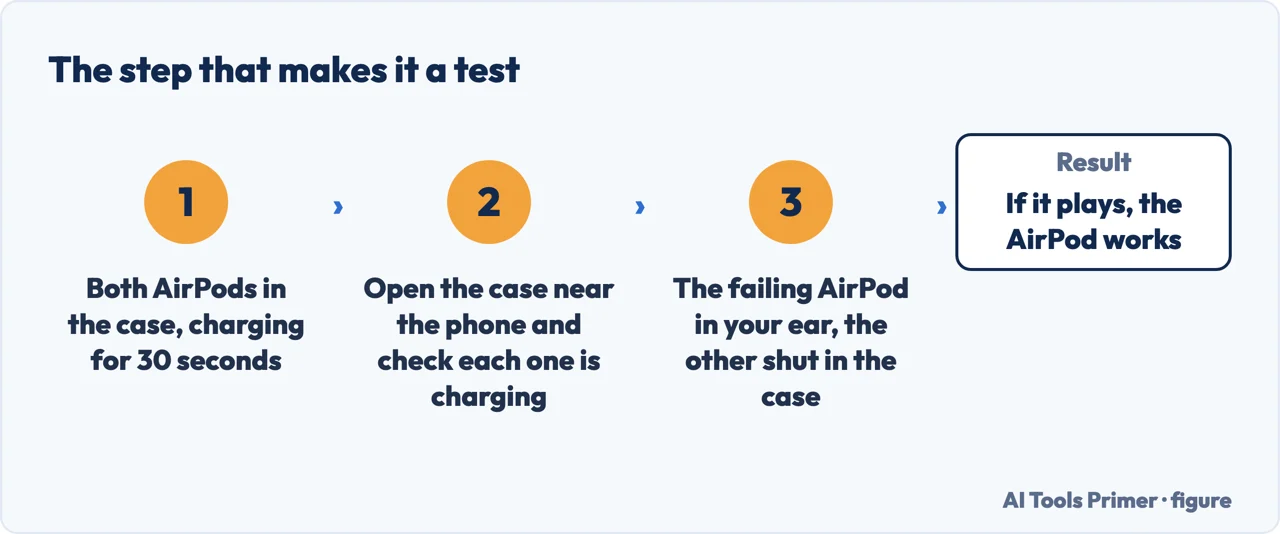
Step six is the point. Shutting the working AirPod in the case removes it from the question — no ambiguity about which one you are hearing, no chance the good one is quietly covering for the bad one. What comes back is a clean answer.
It plays
nothing is brokenApple: put both back in the case, charge 30 seconds, open the case near the phone, and test again. The AirPod works — what failed was the pairing or the charge, and the case fixes it.
It stays silent
go one level down“If an AirPod still isn’t working, reset your AirPods.” And if this one is a replacement bought on its own, Apple sends you to the separate setup for a replacement AirPod instead.
And that first outcome is the one worth testing for, which is why the test is worth doing before anything drastic. An AirPod that plays alone is an AirPod that works; what failed was upstream of it, and Apple’s remedy for that is thirty seconds in a closed case rather than a reset.
The reset is the second rung and it is worth knowing what it costs before you take it. It is not a local action on a pair of earbuds — the pairing goes, and re-pairing follows on the devices that had them. That is a reasonable price for a genuinely broken connection and an unreasonable one for a slider, which brings us to the other half of the page.
Apple’s route for the quiet-side problem ends somewhere unexpected: Settings → Accessibility → Audio & Visual → Balance, and “make sure that the Balance slider is set in the middle”. That is the phone’s stereo balance, not an AirPods control — it shifts everything the device plays toward one channel, on any headphones and on the speaker. A slider nudged once, months ago, presents itself as a failing earbud. It is the same shape as a keyboard that ignores keystrokes because of an accessibility switch: a working device, a setting doing exactly what it was told.
The physical check, and where to look. For the quiet side Apple says to “remove your AirPods ear tips to check the microphone and speaker mesh on each AirPod” and to clean them if there is debris. Two things worth noting: the ear tips come off, which people with a first pair often do not realise, and the mesh is the small fabric grille underneath — the part that actually blocks. Apple keeps separate cleaning instructions for AirPods and for AirPods Pro, and this page will not merge them, because what is safe on one is not automatically safe on the other.
The page said above that Apple keeps separate cleaning instructions for AirPods and for AirPods Pro. Here is what each of them contains, unmerged — because the difference between the two is not a detail, and the wrong procedure on the wrong pair damages the part you were trying to clear.
What Apple’s cleaning instructions actually say. They are wetter than almost anyone expects. Apple asks for “micellar water that includes PEG-6 Caprylic/Capric Glycerides, such as from Bioderma or Neutrogena”, distilled water, “a soft-bristled children’s toothbrush”, two small cups and a paper towel — or the Belkin kit that contains the same idea. The method: saturate the brush, “hold your AirPod with the mesh facing up”, “brush the mesh in circles for about 15 seconds”, then turn it over and blot on the towel so the towel touches the mesh. That is one pass, and Apple wants three — “repeat steps 2-5 two more times (three times total) for each mesh”. Then rinse the brush in distilled water and do the whole thing again with distilled water, to take the micellar water back off. And the part that is easy to skip: “allow your AirPods to dry completely — for at least two hours — before you place them in the charging case or use them.” Apple is equally clear about the boundary: “You can clean the encircled meshes on your AirPods 4 and your AirPods 5. Avoid cleaning any other areas.”
And the difference this page would not guess at. On AirPods Pro the same procedure begins one step earlier: “before you clean your AirPods Pro 2, remove the ear tips.” Apple even describes the grip, because the tips are meant to resist — “pull firmly with your fingers at the base of the ear tip, where the ear tip is attached to the AirPod. If you need more grip, roll the rubber edge of the ear tip inside-out, or use a clean cloth to help remove the ear tip.” The instruction is the same for AirPods Pro 3. That is the whole reason the two sets of instructions are kept apart: on the Pro there is a part covering the mesh, and cleaning the tip is not cleaning the mesh.
And if the mesh is clean, the balance is centred, and one side is not silent but merely quieter, there is a question worth asking before another cleaning cloth comes out.
The test Apple has no reason to publish
Everything above assumes the quiet side is the AirPod. One swap checks that assumption.
If the quiet side moves with the AirPod, everything on this page applies. If it stays with the ear, none of it will help, because the AirPod was never the problem. The NHS lists what a blocked ear sounds like from the inside: “Symptoms of earwax build-up include hearing loss, ear ache and ringing or buzzing in your ears.” It also names the thing people reach for first and tells them not to: “Do not use your fingers or any objects like cotton buds to remove earwax. This will push it in and make it worse.”
There is a reason to run that swap before turning anything up. Turning the volume up until the quiet side is loud enough compensates for the fault instead of removing it, and the World Health Organization sets out where that leads in plain words: someone leaving a loud concert “may afterwards experience muffled hearing or a ringing or buzzing in their ears (known as tinnitus)”, which “often improves as the sensory cells recover” — but “with regular exposure to loud or prolonged noise, the sensory cells and other structures can become permanently damaged, resulting in irreversible noise-induced hearing loss, tinnitus, or both”. Set that list beside the first one and they overlap: muffled hearing, ringing. The same two symptoms belong to a blocked ear and to a damaged one, which is the honest reason this page stops at the swap and sends you to the NHS page rather than carrying on — a page about earbuds cannot tell those apart, and should not pretend to.
If the mesh is clean and the balance is centred and one side is still silent, there is one move left that costs nothing.
“You might need to reset your AirPods if they won’t charge, or to fix a different issue.”
When the quiet side is quiet because it is not really connected, the reset is the last free move. Apple’s sequence starts with patience — “put your AirPods in their charging case, close the lid, and wait 30 seconds” — and then asks you to break the pairing properly first: in Settings, Bluetooth, tap the More Info button next to your AirPods, “tap Forget This Device, then tap again to confirm”. Only then the case: open the lid, and “press and hold the setup button on the back of the case for about 15 seconds”, until “the status light on the front of the case flashes amber, then flashes white”.
On the newest pairs there is no button to hold. For AirPods 4 and AirPods Pro 3 the same first steps end differently: “double-tap the front of the case while the status light is on”. Worth checking which pair is in your hand before holding a button that is not there.
What this page will not do is tell you an AirPod is dead. Apple’s own sequence never reaches that conclusion on its own: it ends at a reset, at replacement setup if you bought a single AirPod, or at its own guided help. Nothing here can look inside yours.
It also will not offer the tricks that circulate for this — the blowing, the tapping, the brief soak in something. Apple publishes cleaning instructions, they differ between AirPods and AirPods Pro, and improvising on a sealed device is how one silent earbud becomes two.
The guides below take it three ways: the reset and what it costs, the case and the charge, and the settings elsewhere on the phone that make working hardware look broken.
Three ways in. If one side is quiet rather than silent, take the third.
Shut the working AirPod in the case and the silent one has nowhere to hide. Apple’s seven steps, with the outcome attached to each result.
The second rung, and not a local action. Worth knowing what it costs before using it on a problem that was never a pairing problem.
A blocked mesh under the ear tip, or a stereo balance slider in Accessibility that affects everything the phone plays.
Not covered here. It will not tell you an AirPod is dead. Apple’s sequence never reaches that conclusion by itself, and nothing here can see inside yours.
It will not repeat the tricks that circulate for this. Apple publishes cleaning instructions, they differ between AirPods and AirPods Pro, and improvising on a sealed device makes things worse rather than quieter.
And it will not tell you to reset first. Apple puts the reset second, after a test that often makes it unnecessary. What holds instead is simple: Apple’s cleaning method is Apple’s own, and the two health warnings come from health authorities rather than from the company selling the earphones.
Written by Alberto Gulotta
Founder and editor of AI Tools Primer, writing from Palermo, Italy. Thirty-five years of taking computers apart, starting with a Commodore 64 — the long version is on the about page.
Something wrong on this page? Write to aitoolsprimer@gmail.com and it gets fixed.
Written on 22 August 2026 · last checked 23 September 2026.
Independence and limits
No affiliate links and no paid placements anywhere on this site. Nobody pays to appear here, and no company has seen this page before you did.
This is general information, not professional advice. Where a page touches money, health, safety or the law, it names its source and the date it was read — and your situation may still differ. See the privacy page and the cookie policy.