
iPhone · guide
How to set up eSIM on iPhone, and what your carrier decides
By Alberto Gulotta · Updated · 9 min read
Apple documents five different ways to do this, and says plainly that which one applies is not up to you. That is the first thing to know about how to set up eSIM on iPhone, because it decides whether any given set of steps is yours to follow.
“You can activate your eSIM on iPhone through one of the following methods, depending on your carrier’s eSIM support.”
Apple’s framing, and it is the thing to understand before following any set of steps. Five documented routes, and you do not choose between them: the carrier does, by supporting one and not another. The same fact has an uncomfortable other side, and it is worth knowing here rather than later: because the carrier decides who a number belongs to, it is also the carrier that can be talked into moving it to a stranger — a SIM swap, and the free lock against it. So a procedure that does not match what is on your screen is not necessarily wrong — it may simply belong to a different carrier’s route.
The five routes Apple documents
- eSIM Quick Transfer — moving the number from your previous iPhone “without contacting them”.
- eSIM Carrier Activation — the carrier sends the eSIM digitally.
- A QR code from the carrier.
- Other methods, where a carrier uses its own.
- Transfer from an Android or other non-Apple device.
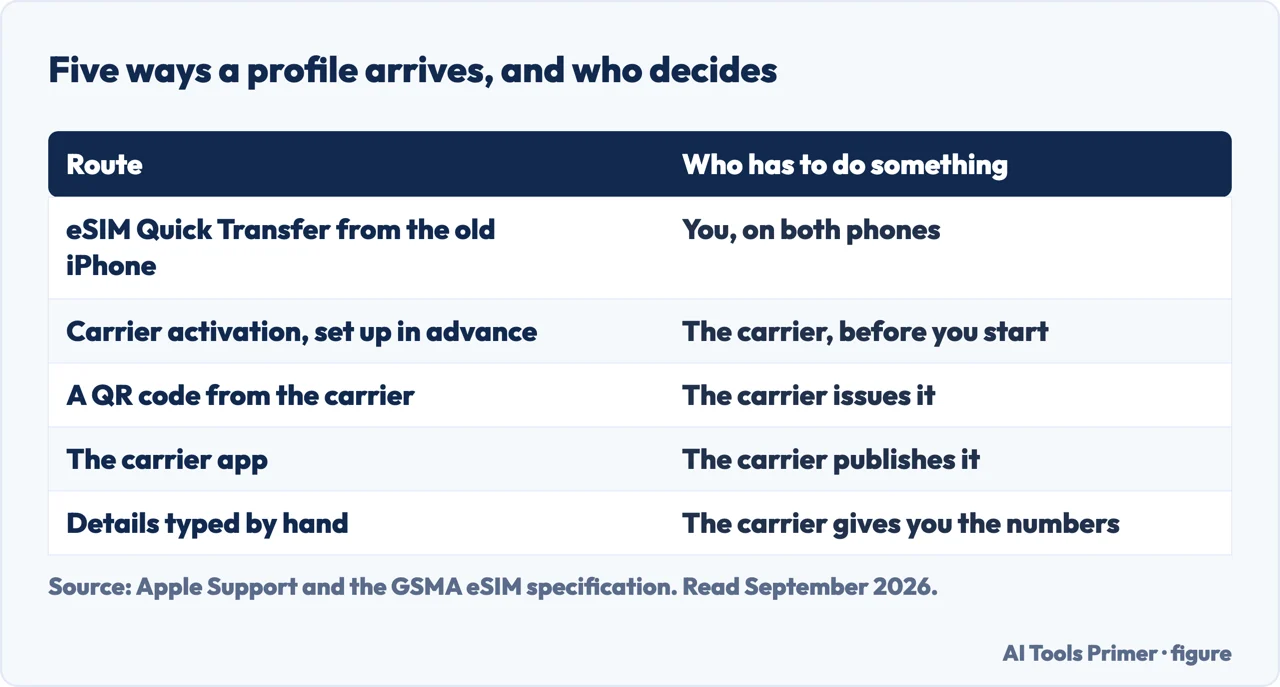
So the first useful step is not a setting. It is finding out which of those five your carrier supports — Apple maintains a list of carriers and worldwide service providers that offer eSIM, and links it from the same page. Starting there saves following steps that were never going to apply.
Apple’s own definition is worth having too, because the word suggests something smaller than it is: an eSIM is “an industry-standard digital SIM built into your iPhone, eliminating the need for a physical SIM card”, and a phone can “manage up to eight or more eSIMs”. It is not one slot made digital.
What has to be true before any of it. Apple lists what you need as an iPhone XS, XS Max, XR or later, a carrier that supports eSIM, and a Wi-Fi network or hotspot — with an exception: “In some countries and regions, iPhone models that are eSIM only can activate without a Wi-Fi network.” It also names two places where the rules differ: in China mainland only the iPhone 17e and iPhone Air support eSIM, and in Hong Kong and Macao certain models take two physical nano-SIM cards instead. Where you are is part of the answer.
The first route is the one that appears when a new phone comes out of its box. Apple: with eSIM Quick Transfer “you can transfer the SIM from your previous iPhone to your new iPhone without contacting them” — and, with some carriers, convert an existing physical SIM to an eSIM on the same phone.
What Quick Transfer needs before it will work
Four conditions, and the last one rules out a lot of older phones.
- Both devices signed in
- “You’re signed in to both devices with your Apple Account.”
- The old phone unlocked
- “Unlock your previous iPhone with the device passcode.”
- Nearby, with Bluetooth on
- “Both devices are nearby with Bluetooth turned on.”
- iOS 18.4 or later
- On both devices. Which means the phone you are leaving behind may need an update before it can hand anything over.
If the transfer did not happen during setup, Apple gives the route afterwards: Settings → Cellular → Set Up Cellular or Add eSIM → choose a plan to transfer. And a specific instruction for the moment the screen is empty: “If you don’t see a list of numbers, tap Transfer From Nearby iPhone.” That is the button people miss, because a blank list reads as a failure rather than as a prompt.
“When the cellular plan on your new iPhone activates, it deactivates your previous SIM.”
Stated twice on Apple’s page, and worth planning around rather than discovering. The transfer is not a copy: the moment the new phone has the number, the old one does not. If the old phone was doing anything you still need — two-factor codes arriving by text, a second line, a handset somebody else is using — that stops at the moment the new one starts. The temptation at that point is to switch the second factor off rather than move it; on several services the switch no longer exists, and where it does it leaves two things behind — see turning two-factor off.
One more thing that has changed recently enough to be worth stating with its version attached. Apple: “With iOS 26, you can transfer more than one phone number to your new iPhone.” On earlier software that is a one-at-a-time job, which matters to anybody moving a phone that carries two lines.
What an eSIM is, from the body that wrote the specification. The GSMA describes it as “a global specification… which enables remote SIM provisioning of any mobile device”, and states the limit that explains most of the confusion: an eSIM “allows consumers to store multiple operator profiles on a device simultaneously, and switch between them remotely, though only one can be used at a time”. Several profiles stored, one active. That is why a second line does not double your connection, and why switching carriers is a menu rather than a shop visit.
The guides below take it three ways: which route applies to you, what the transfer needs, and the neighbouring settings for a phone that has just changed hands or countries.
Where to start
Three ways in.
- “Which method am I supposed to use?”
- Start at the five routes
- “I have a new iPhone in front of me.”
- Go to quick transfer
- “What happens to my old phone?”
- That is when the old sim stops
The five routes
Apple documents five and says the carrier decides. Which is why a single set of steps fits some phones and not others.
Quick Transfer
Four conditions, including software on the phone you are leaving behind — and a button that only appears once you know a blank list is not a failure.
When the old SIM stops
At the moment the new plan activates, by Apple’s own account. Anything the old phone was still doing with that number stops with it.
Not covered here. It will not give one procedure. Apple documents five and says the carrier decides which applies, so a single set of steps would be right for some readers and misleading for the rest.
It will not treat the transfer as a copy. Apple says activating the new plan deactivates the previous SIM, and that is worth knowing before rather than after.
And it will not skip the regional exceptions. Apple names places where the rules differ, and a page that ignored them would be wrong for the people living there. What holds instead is simple: the statement that the activation method depends on carrier support is Apple’s own, quoted with the five documented routes and the regional exceptions.
Sources
- Apple, Set up eSIM on iPhone (the definition of an eSIM as an industry-standard digital SIM built into the iPhone, able to manage up to eight or more eSIMs; the requirements of an iPhone XS, XS Max, XR or later, a carrier that supports eSIM, and a Wi-Fi network or hotspot, with the exception that in some countries and regions eSIM-only models can activate without Wi-Fi; the notes that in China mainland only iPhone 17e and iPhone Air support eSIM and that in Hong Kong and Macao certain models use two nano-SIM cards; that the activation method depends on the carrier’s eSIM support, with five routes — eSIM Quick Transfer, eSIM Carrier Activation, a QR code, other methods, and transfer from an Android or other non-Apple device; that Quick Transfer moves the SIM from a previous iPhone without contacting the carrier and with some carriers converts a physical SIM to an eSIM; the four prerequisites of being signed in to both devices with an Apple Account, unlocking the previous iPhone with its passcode, both devices nearby with Bluetooth on, and both on iOS 18.4 or later; that with iOS 26 more than one phone number can be transferred; the post-setup route via Settings → Cellular → Set Up Cellular or Add eSIM and the Transfer From Nearby iPhone instruction when no numbers are listed; and that when the cellular plan on the new iPhone activates it deactivates the previous SIM) — support.apple.com, read 22 August 2026.
- GSMA — What is eSIM for Consumer and IoT: the specification behind the feature, and the rule that several profiles can be stored but only one used at a time — www.gsma.com, read 4 September 2026.
Written by Alberto Gulotta
Founder and editor of AI Tools Primer, writing from Palermo, Italy. Thirty-five years of taking computers apart, starting with a Commodore 64 — the long version is on the about page.
Something wrong on this page? Write to aitoolsprimer@gmail.com and it gets fixed.
Written on 22 August 2026 · last checked 23 September 2026.
Independence and limits
No affiliate links and no paid placements anywhere on this site. Nobody pays to appear here, and no company has seen this page before you did.
This is general information, not professional advice. Where a page touches money, health, safety or the law, it names its source and the date it was read — and your situation may still differ. See the privacy page and the cookie policy.