
Video · guide
How to edit a video: Clipchamp and iMovie steps in order
By Alberto Gulotta · Updated · 16 min read
How to edit a video for the first time, in an order we arranged: bring the clips in, cut, set the sound, add titles and export. We follow the steps Microsoft gives for Clipchamp and Apple for iMovie on a Mac, and add TechSmith's figures where it gives them.
| Question | Answer | Where it comes from |
|---|---|---|
| Which editors does this page follow? | Clipchamp, which runs in a browser, and iMovie on a Mac | Microsoft Support, Apple Support |
| Where do the clips go first? | Into Clipchamp’s My media, then onto the timeline | Microsoft Support |
| How do I cut? | Clipchamp: move the seeker, click the scissors or press S. iMovie: drag the clip’s edge toward its center | Microsoft Support, Apple Support |
| How loud should dialogue be? | TechSmith gives -12 to -6 dB, with music between -25 and -18 dB | TechSmith |
| What does Clipchamp export? | An MP4 at 30 fps; 480p, 720p and 1080p are in the free tier | Microsoft Support |
Pick an editor and bring the clips in
Microsoft’s support page says Clipchamp is available for personal accounts and for work and school accounts, and that it runs on Windows, Mac, Linux and Chromebook. The personal version opens at app.clipchamp.com in an Edge or Chrome browser window, and Windows users can also download the Microsoft Clipchamp app for Windows 11 and Windows 10. Apple’s iMovie pages that we read give the Mac steps for trimming and titles; the sharing page also covers iPhone and iPad. For the phone, our page on editing videos on iPhone has the Photos and iMovie steps.
The pages we read do not agree on one best editor, so we do not rank them. TechSmith’s guide, dated 15 August 2025, sorts tools into three kinds, mobile, browser-based and desktop, and says browser-based tools work well for simple cuts; it names Clipchamp among them. The same guide carries tips for TechSmith’s own Camtasia, so its figures are TechSmith’s. Derek Lieu, who edits game trailers, recommended DaVinci Resolve in a post dated 31 December 2022, writing that it is free and that its exported video is not watermarked, and that even professionals have little reason to upgrade to the paid version. That is a 2022 view from one editor. What Blackmagic says about the free version is on our page about DaVinci Resolve.
In Clipchamp, files go into the media library before editing starts. Microsoft lists three ways: drag and drop files from your computer into My media, click the import media button, or click the arrow button to import through OneDrive. You can add video, images and audio. To put a video on the timeline, click the green + button or drag it there; for several files, repeat the step or highlight them all and drag them together. Microsoft also describes a shortcut: right-click a media file in Windows Explorer and click the edit with Clipchamp button, which opens a new video with the file already loaded.
Microsoft adds a warning about the originals. Microsoft says Clipchamp does not upload your videos to a server for processing; it processes them locally on your computer, so it may ask you to relink files, and Microsoft says to keep the originals or turn on the content backup feature, which spares you the relinking. Videos you edit are saved automatically while you work.
Before importing, TechSmith suggests giving files descriptive names, grouping related clips into bins or folders and deleting unusable footage right away. It proposes a naming pattern, ProjectName_Date_Version_Description, with the example TrainingModule1_2025Aug07_v2_FinalEdit, and numbering clips in recording order, such as 01_intro and 02_demo. It also suggests at least 50 GB of free storage per project for raw footage. Lieu adds a warning for screen recordings made with OBS: most video editing software, Lieu writes, will not let you import MKV files, so the recording should end up as MP4. Our page on MP4 and converting covers that step.
Cut: keep what the video needs
Cutting has three jobs, and Microsoft names them apart. Splitting cuts a clip into two or more parts you can edit, move or delete. Trimming means dragging the sides of a clip inward to shorten it or outward to lengthen it, and Microsoft says you can also trim by splitting a clip and deleting the part that is left. Cropping removes unwanted edges or black bars from the frame, which is a different job from cutting in time.
In Clipchamp. To trim, click the clip on the timeline so it is highlighted, then drag the green bars back and forth. To split, select the clip, move the seeker, which Microsoft describes as the white vertical line with a circle on top, to where you want the cut, and click the split button, the scissors icon, or press S. The video becomes two assets. Microsoft says to use the timecode above the timeline as a guide. To remove the piece you do not want, click it and press Delete or Backspace. If audio and video are attached, the audio splits with the video; to split them while they are separate, hold Shift and select both first. The zoom buttons on the toolbar, + and -, and the zoom to fit button help when a long timeline is hard to read.
In iMovie on a Mac. Apple’s Trim clips page says to skim to the beginning or end of a clip in the timeline and drag its edge toward the center to shorten it, or away from the center to extend it; extending works only when the clip has unused portions. The clip trimmer, opened with Window > Show Clip Trimmer, shows how much of the clip is used and closes when you press Return. To keep one stretch, press and hold R and drag across the clip to select the frames you want, then Control-click the clip and choose Trim Selection. The same table of contents lists a Move and split clips page that we did not read, so we give no split steps for iMovie.
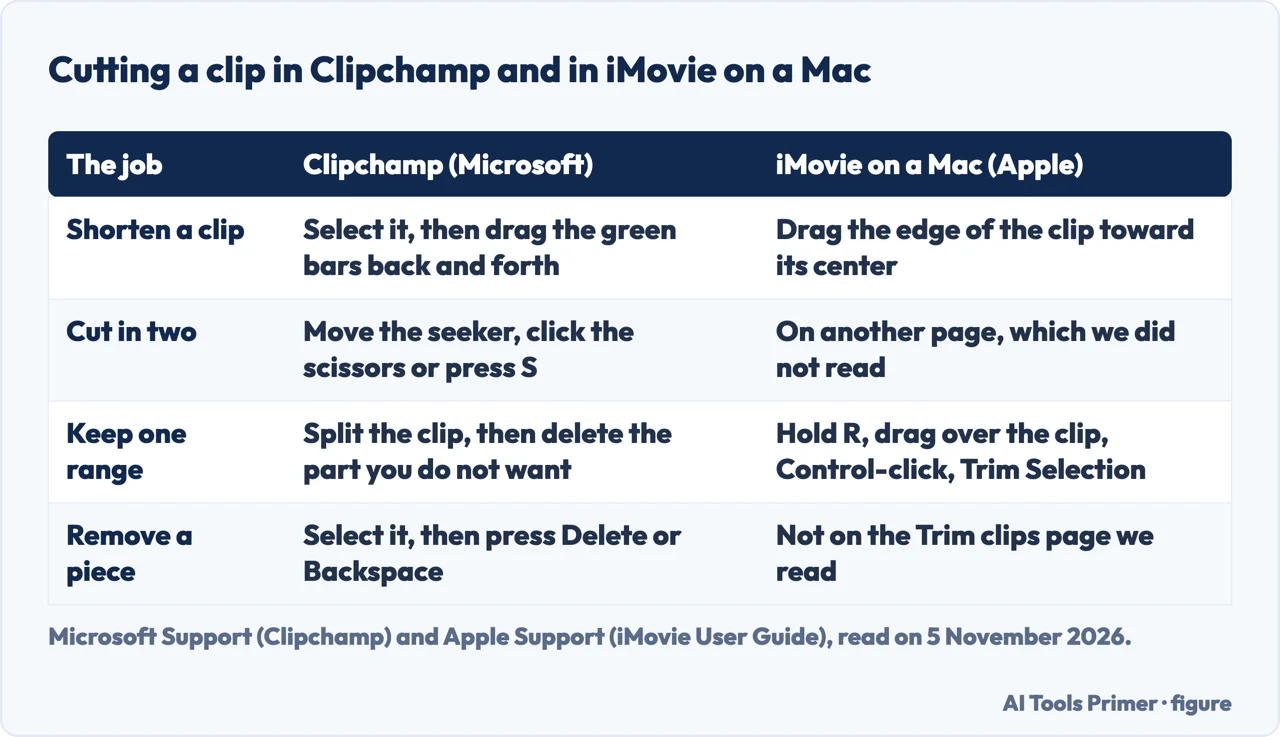
What to cut, and a variant that never changes the file
TechSmith’s guide names no particular editor for this step. It lists cutting rambling intros down to the essentials, removing filler words such as “um” and “uh”, trimming dead air longer than 2 to 3 seconds, and cutting on action or speech for smoother transitions. That is TechSmith’s guidance, and TechSmith sells Camtasia; the pages we read do not say how long a first edit will take, apart from TechSmith’s estimate of one to two hours of editing for each finished minute, which would make a five-minute video 5 to 10 hours. Treat that as one company’s estimate, not a promise.
Panopto, whose support page covers the editor in its own video platform for Enterprise plans, describes a different kind of cut. It says all edits are non-destructive and any cut can be undone, even after saving, and that highlighted sections will not be shown to viewers. It also warns that cuts remove captions and quizzes that appear at those times, and recommends checking their times after cutting. The idea behind it, that a cut hides part of a video rather than destroying it, is not something the Clipchamp or iMovie pages we read say about their own tools.
Sound: music and volume
For music, Clipchamp’s page says to click the content library tab on the toolbar, then the audio category, where stock music is found, and to drag a track onto the timeline or click the + button. To change a level, click the audio on the timeline, open the audio tab on the property panel and drag the volume slider to the left to turn it down or to the right to turn it up. The same panel has the fades, filters, effects and speed controls. Clipchamp can also export audio only, as an .m4a file.
The only sound levels come from TechSmith, which says viewers may click away after just a few seconds if the sound is poor. It layers a mix in this order: dialogue or narration on the main audio track, background music on a second track at about 20 to 30% of the volume, and sound effects on separate tracks. Its figures for the finished mix are in the table; they are levels for the edit, not for setting a microphone before recording, which our page on microphone volume covers. Microsoft’s page gives a slider and no level, and the Apple pages we read, on trimming, titles and sharing, give no volume levels and no steps for changing the volume. The iMovie guide’s table of contents lists pages on changing volume and fading audio, which we did not open.
__FIGURA__1For a very first project, Lieu suggests less: start by cutting footage to music with no sound effects and no transitions, counting cross dissolves and fades among the transitions to leave out at first. Lieu adds that a lot can be done with the order of the shots, their length and where each sits against the music, and points to trailer music of 60 to 120 seconds from YouTube.
Titles: adding text on screen
In Clipchamp, click the text tab on the toolbar, scroll through the styles, and drag one onto the timeline above your video or click the + button. In iMovie on a Mac, Apple says to select Titles above the browser; the available styles appear there, with titles tied to a theme at the top if the movie has one. Either position the playhead where the title should start and double-click the style, or drag it to the timeline above or over a clip.
Where a title is dropped on a clip matters in iMovie. Apple says that if you place it in the first or last third of the clip, its duration adjusts to that third, and if you place it in the center, it covers the whole clip. To write the text, select the title, double-click the placeholder text in the viewer and type; the font controls above the viewer change the font, color, size, style and alignment, and you click Apply when finished. Apple notes that the font cannot be changed in certain theme-styled titles and some animated titles. To remove a title, select its bar in the timeline and choose Edit > Delete or press the Delete key.
On how much text to use, TechSmith says to add text overlays for key points, to keep each on screen for 3 to 5 seconds and to use at least 24 pt text so it can be read on a phone. It also says to use simple cuts between most clips and to keep dissolves and fades for scene changes.
Export and save
Clipchamp. Click the export button at the top right of the editor and choose a quality. Microsoft says you get an MPEG-4 file at 30 fps, and offers four resolutions, 480p, 720p, 1080p and 4K, as well as a 15-second GIF and audio-only. The free account tier has 480p, 720p and 1080p; 4K, or premium stock media and features, needs a Microsoft 365 personal or family subscription or the Clipchamp Premium plan. Processing begins by itself, and when it ends you can save the file to your computer or send it to OneDrive, Google Drive, YouTube, TikTok, Dropbox or LinkedIn, the sharing options Microsoft lists for the personal version.
__FIGURA__2iMovie on a Mac. Apple’s sharing page says to click Share, then File, choose a resolution and a location, and click Save. The default resolution is based on the media in the video; a lower one gives a smaller file that uploads to the web faster, and a higher one gives a larger file, suitable for a Mac or for a high-definition television through Apple TV. For YouTube or Facebook, iMovie has optimized settings under YouTube & Facebook: it saves a file, which you then upload in a web browser. For email, a warning appears if the video exceeds the recommended limit, which Apple says is usually 10 MB. For devices, apps or sites that do not support MOV files, Apple says to export an MP4 with Share > Export File; the options in that window include Medium or Low quality and 720 or 540 resolution. If you only want to trim or change the speed after sharing, Apple says the Photos app on a Mac can do it. Our page on MOV to MP4 goes further.
TechSmith’s table. For YouTube and LinkedIn it recommends 1920 by 1080 at 30 fps as MP4 (H.264); for TikTok 1080 by 1920; for Instagram 1080 by 1080. It adds audio at 44.1 kHz, 128 to 192 kbps, stereo, with AAC as the codec, and says to use 60 fps only if the original footage was recorded at 60. It also suggests keeping a master high-quality version for archiving before making versions for each platform. For size and upload, see compressing video and uploading to YouTube.
What we did not use
We tested nothing in either editor. The pages we read do not put the steps in one path across two editors, and they do not tell you how large an MP4 will be. We read the Canva and VideoStudio pages but did not use them: one is a product page and the other a guide from a software seller. Adobe says its Express editor is free in the browser with no credit card required, and lets you cut, trim and split and download an MP4; that comes from Adobe’s own product page, and we did not go further. Panopto’s editor is for users with the Creator role on Enterprise plans, so we used it only for the idea of a non-destructive cut. Subtitles are a separate job: see SRT files.
Where to start
Five ways in.
- “Where do I start?”
- Pick an editor and bring the clips in — pick
- “How do I cut a clip?”
- Cut: keep what the video needs — cut
- “How loud should the music be?”
- Sound: music and volume — sound
- “How do I add text?”
- Titles: adding text on screen — titles
- “Which size do I save?”
- Export and save — export
What to edit with
The phone, a free editor and the computer.
After the last cut
Converting, shrinking and uploading.
Questions people also ask
How can I edit an existing video?
In Clipchamp, add the file to My media by dragging it in or with the import button, put it on the timeline, trim or split it, and click export at the top right. Microsoft says to keep the original files, because Clipchamp processes them on your computer.
How do I edit a video from my phone?
The pages we read for this guide are about Clipchamp and iMovie on a Mac. For the phone, our page on editing videos on iPhone gives the Photos and iMovie steps.
How can I cut and edit a video?
In Clipchamp, select the clip, move the seeker to where you want the cut, then click the scissors or press S; delete the piece you do not want. In iMovie on a Mac, Apple says to drag the edge of the clip toward its center to shorten it.
How long does a first video edit take?
The pages we read do not say how long a first edit takes. TechSmith estimates one to two hours of editing for each finished minute of video, so five minutes would take 5 to 10 hours; treat that as one company’s estimate for work videos, not a promise.
Not covered here. We tested nothing in either editor. The statements come from four Microsoft Support pages on Clipchamp, three Apple Support pages on iMovie, TechSmith, Derek Lieu and Panopto, plus Adobe’s product page for one qualified remark, all read on 5 November 2026.
The search volume and difficulty behind this page come from an Ubersuggest reading of 5 November 2026; the difficulty is Ubersuggest’s SEO difficulty, not Semrush’s, and a Semrush check is still to be made.
Sources
- Microsoft Support — How to edit a video in Clipchamp — support.microsoft.com, read 5 November 2026.
- Microsoft Support — How to split or cut videos and audio assets — support.microsoft.com, read 5 November 2026.
- Microsoft Support — How to choose the right export resolution — support.microsoft.com, read 5 November 2026.
- Microsoft Support — What format is my video exported in? — support.microsoft.com, read 5 November 2026.
- Apple Support — Trim clips in iMovie on Mac — support.apple.com, read 5 November 2026.
- Apple Support — Add titles in iMovie on Mac — support.apple.com, read 5 November 2026.
- Apple Support — Share or export your iMovie video — support.apple.com, read 5 November 2026.
- TechSmith — The Ultimate Video Editing Workflow for Content Creators — www.techsmith.com, read 5 November 2026.
- Derek Lieu — The Complete Beginner’s Guide to Editing Your First Video — www.derek-lieu.com, read 5 November 2026.
- Panopto Support — How to Edit a Video — support.panopto.com, read 5 November 2026.
- Adobe — Free Online Video Editor | Adobe Express — www.adobe.com, read 5 November 2026.
Written by Alberto Gulotta
Founder and editor of AI Tools Primer, writing from Palermo, Italy. Thirty-five years of taking computers apart, starting with a Commodore 64 — the long version is on the about page.
Something wrong on this page? Write to aitoolsprimer@gmail.com and it gets fixed.
Written on 6 November 2026.
Independence and limits
No affiliate links and no paid placements anywhere on this site. Nobody pays to appear here, and no company has seen this page before you did.
This is general information, not professional advice. Where a page touches money, health, safety or the law, it names its source and the date it was read — and your situation may still differ. See the privacy page and the cookie policy.