
Video · guide
OBS screen recorder, and the blank scene it opens with
By Alberto Gulotta · Updated · 12 min read
The single most confusing thing about this program is documented in one sentence by the people who make it, and it explains a first attempt that records nothing at all.
“When you start OBS Studio, you start with a blank scene by default.”
That single sentence describes the state the program is in when it opens: nothing is being recorded. There is no default capture and no obvious button to make one. OBS does not decide what to record — you tell it, by adding a Source, and until you do there is nothing for it to save. It is not broken and you have not missed a step; the step is the one that comes next.
Everything else follows from that. OBS is built around a stack of Sources that you assemble — a screen, a window, a webcam, a picture, some text — and a recording is whatever that stack adds up to. The program that records your screen is the same program that runs a broadcast with four cameras, which is why it opens empty rather than ready.
The order OBS gives
Four steps, from its own quick start guide.
- Let the Auto-Configuration Wizard run. It “optimises OBS Studio for your needs”, taking into account what you want to do, “your computer’s hardware resources, and your network conditions”. It appears the first time you open the program; afterwards it lives at Tools → Auto-Configuration Wizard.
- Add a Source. At the bottom of the window is the Sources dock — click the +. Which one to pick depends on your operating system, and that is the next section.
- Check the sound is arriving. “By default, OBS Studio is set to capture your desktop audio and microphone” — verify by watching the meters move in the Audio Mixer. If they are still, go to Settings → Audio and choose the devices by hand.
- Check Settings → Output, then press Start Recording on the Controls dock.
Step two is the one with a real decision in it, and the wrong choice there produces a recording of the wrong thing — or of nothing. OBS lists its sources by what they capture and by which systems they work on.
Which source captures a screen
OBS names a different one depending on the system — and, on Mac, on the version.
- Windows and Linux
- Display Capture for a whole screen, Window Capture for one window. OBS also lists Game Capture — “Windows only” — for “hardware-accelerated games with high performance”.
- macOS 13 and later
- macOS Screen Capture, which covers “a display, window, or application — including desktop audio”.
- macOS 12.6 and earlier
- Display Capture and Window Capture, the same names as on Windows and Linux.
- A webcam or capture card
- Video Capture Source, which OBS lists separately from all of the above.
One line in that list deserves to be pulled out, because it dates every set of instructions written about this program.
“Capture an entire display on Windows, Linux, and macOS 12.6 and prior. On macOS 13, use macOS Screen Capture.”
OBS repeats that split for both Display Capture and Window Capture, which makes it the detail most likely to send a Mac user in circles. The source named in an older set of instructions may still exist and still be the wrong one. If you are on a recent macOS and a guide tells you to add Display Capture, that guide was written for a version before yours — and the replacement covers more, since OBS says the newer source takes desktop audio along with the picture.
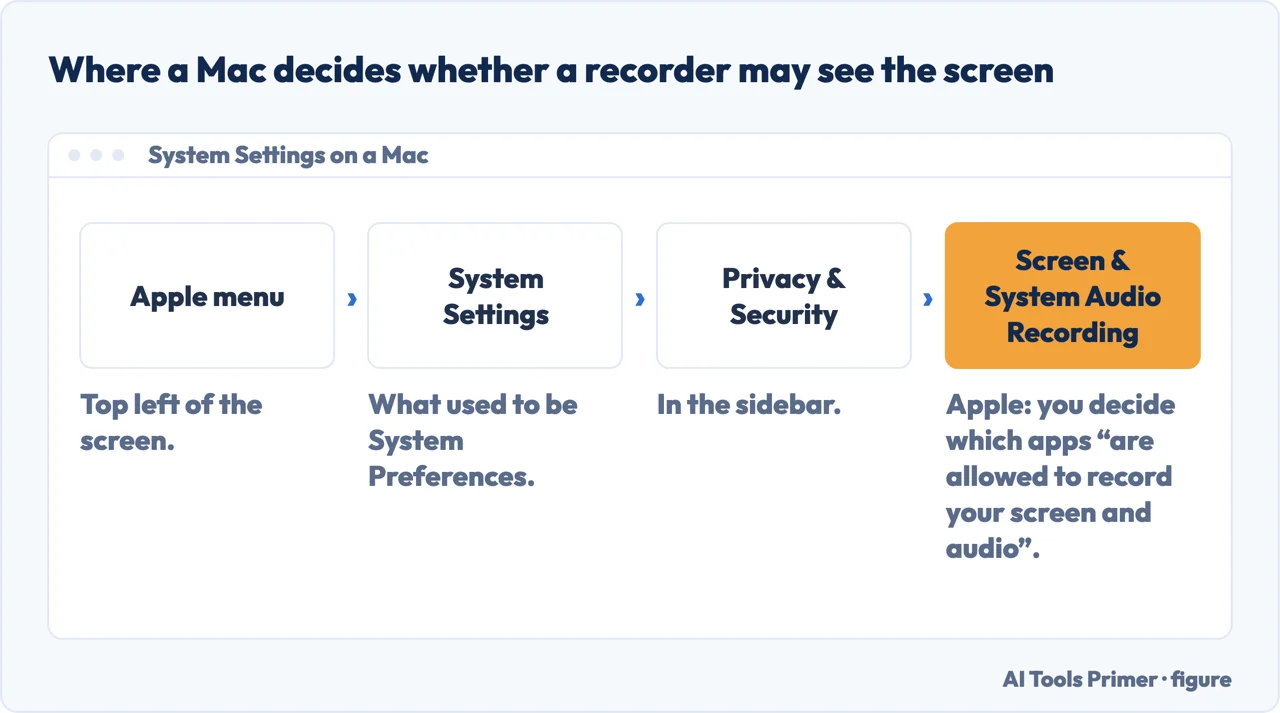
One thing OBS cannot tell you about a Mac, because it is not OBS’s to tell: the permission. Apple gates screen capture behind a setting of its own, on the page “Control access to screen and system audio recording on Mac”: “Some apps and websites can access and record the screen and audio on your Mac. You can decide which apps and websites are allowed to record your screen and audio.” It lives under Apple menu → System Settings → Privacy & Security → Screen & System Audio Recording. A recorder with the right source added for the right version of macOS that still produces a black rectangle has a second place to look, and it is outside the program.
There is a second thing worth knowing about the Sources list, and it is not obvious from looking at it: the order is the stacking order. OBS states it plainly — “Sources that are above others in the Sources list… are also located above other Sources in the preview”, and “a Source that is listed above another Source in the list will be on top and might hide what’s beneath it”.
That is the answer to a whole category of confusion — a webcam that has vanished, a screen capture that covers everything. Nothing is missing; something is in front of it. OBS says the list can be reordered “by using drag and drop in the list, or using the up and down arrow buttons”, and the same fact is useful deliberately: it is how you put a webcam on top of a screen recording rather than behind it.
The audio step is worth taking seriously rather than assuming, because OBS phrases it as a default rather than a certainty. It says the program “is set to capture your desktop audio and microphone”, and then immediately tells you how to check — the meters — and what to do if the check fails. A default that comes with its own verification instruction is a default worth verifying.
The instruction OBS puts at the end, in its own words. “We strongly encourage running a test for a few minutes to make sure that there are no issues, rather than just jumping in to your first stream or recording.” It is the difference between finding a silent microphone in two minutes and finding it after an hour of talking. The audio meters are the thing to watch during that test: OBS has already told you they should be moving.
What this page will not do is give you the settings. Settings → Output is where the quality and format decisions live, and the right values depend on the machine, the screen and what the recording is for — which is exactly why OBS ships the Auto-Configuration Wizard and why the first step above is to let it run rather than to type numbers into boxes.
Nor will it compare OBS with anything else. Both Windows and the iPhone have screen recorders built in, and they need no installation and no scene to assemble; the guides below cover them, and each is written from its own maker’s documentation. Which of the three suits you is a question about what you are recording, and none of them needs to be bought.
The guides below take it three ways: the blank scene and how to fill it, the recorders already on your machine, and what to do with the file once it exists.
Where to start
Three ways in. If your recording came out empty, the first one is why.
- “I recorded and got nothing.”
- The blank scene explains it — the blank scene
- “Which source do I add on a Mac?”
- That depends on the version — choosing a source
- “Is there something simpler?”
- Yes, and it is already installed — what is already there
The blank scene
OBS captures nothing until a Source is added, and the Sources list doubles as the stacking order. Both facts explain a recording that looks wrong.
Choosing a source
Different names on different systems, and a split at macOS 13 that quietly invalidates older instructions. OBS publishes the whole list.
What is already there
For a short capture, the recorder on the machine is usually less work. These guides cover the built-in ones and what comes after the recording.
Not covered here. It will not give you output settings. OBS ships a wizard that sets them from your own hardware, and numbers copied from somebody else’s machine are numbers for somebody else’s machine.
It will not tell you OBS is the right tool for a two-minute capture. Windows and the iPhone both have recorders already installed, and for that job they are less work.
And it will not repeat instructions that name Display Capture on a current Mac. OBS says that source is for macOS 12.6 and earlier, and following it on a newer system is following a guide written for a machine you do not have. What holds instead is simple: the blank scene is where OBS’s own documentation starts too, and the permission step comes from Apple because that is whose permission it is.
Showing somebody what is on your screen
Onto a television, into a file, or up to somebody else. The screen is the easy part; getting it out of the room is the hard part.
- The same job, in the other places it comes up
- How to screen mirror iPhone to TV, or stream to it instead
- How to screen record on iphone: button, sound, black screen
- How to screen record on Windows 11, without installing anything
- How to upload a video to YouTube at the right settings
Sources
- OBS Project, Quick Start Guide (that the Auto-Configuration Wizard optimises OBS Studio for the user’s needs taking into account the intended use, the computer’s hardware resources and network conditions, that it appears the first time OBS Studio is run and can be reopened from Tools → Auto-Configuration Wizard; that OBS Studio starts with a blank scene by default and that Sources are added from the Sources dock using the + symbol; that Display Capture and Window Capture are the sources for Windows and Linux and macOS Screen Capture for macOS, that Game Capture is Windows only and intended for 3D games, and that Video Capture Source captures a webcam or capture card; that by default OBS Studio is set to capture desktop audio and microphone, that this can be verified by the volume meters in the Audio Mixer and corrected in Settings → Audio; that output settings are checked in Settings → Output before clicking Start Recording on the Controls dock; and the encouragement to run a test for a few minutes to make sure there are no issues rather than jumping straight into a first recording or stream) — obsproject.com, read 22 August 2026.
- OBS Project, Sources Guide (that Display Capture captures an entire display on Windows, Linux and macOS 12.6 and prior while on macOS 13 the macOS Screen Capture source should be used, with the same split stated for Window Capture; that macOS Screen Capture captures a display, window or application including desktop audio on macOS 13 and later; that Game Capture is Windows only and captures hardware-accelerated games with high performance; that sources are added with the + button and removed with the − button at the bottom of the Sources dock; and that sources listed above others in the Sources list are located above them in the preview and may hide what is beneath, with the order changed by drag and drop or the up and down arrow buttons) — obsproject.com, read 22 August 2026.
- Apple — macOS User Guide, Control access to screen and system audio recording on Mac (that you decide which apps and websites are allowed to record the screen and audio, and where the setting lives in System Settings under Privacy & Security) — support.apple.com, read 6 September 2026.
Written by Alberto Gulotta
Founder and editor of AI Tools Primer, writing from Palermo, Italy. Thirty-five years of taking computers apart, starting with a Commodore 64 — the long version is on the about page.
Something wrong on this page? Write to aitoolsprimer@gmail.com and it gets fixed.
Written on 22 August 2026 · last checked 23 September 2026.
Independence and limits
No affiliate links and no paid placements anywhere on this site. Nobody pays to appear here, and no company has seen this page before you did.
This is general information, not professional advice. Where a page touches money, health, safety or the law, it names its source and the date it was read — and your situation may still differ. See the privacy page and the cookie policy.