Click the first row number in the grey margin and drag down to the last one you want.
Once the rows you need run past the bottom of the screen, the drag has to scroll the sheet as well.

Docs · guide
By Alberto Gulotta · Updated · 14 min read
How to add multiple rows in Excel: select as many rows as you want to insert, right-click the selection and choose Insert. Five selected rows give five new ones. That is the whole rule, and Microsoft prints it for the Mac and for the web, not in the Windows steps.
| The page | What only it tells you | Versions it lists |
|---|---|---|
| Insert or delete rows and columns, Windows tab | The ribbon route, the Insert Options button, and the size of the sheet | 365, 2024, 2021, 2019, 2016 |
| The same page, Web tab | “To insert multiple rows: Select the same number of rows” | Excel for the web |
| Insert one or more rows … in Excel for Mac | The same rule, with an example, and CONTROL-click instead of right-click | 365 for Mac, 2024, 2024 for Mac, 2021 for Mac |
| Select specific cells or ranges | The Name box, which is how you select a thousand rows without scrolling | 365, 2024, 2021, 2019, 2016 |
The rule is one sentence, and it is not where you would look for it
“To insert multiple rows: Select the same number of rows above which you want to add new ones. Right-click the selection, and then select Insert Rows.”
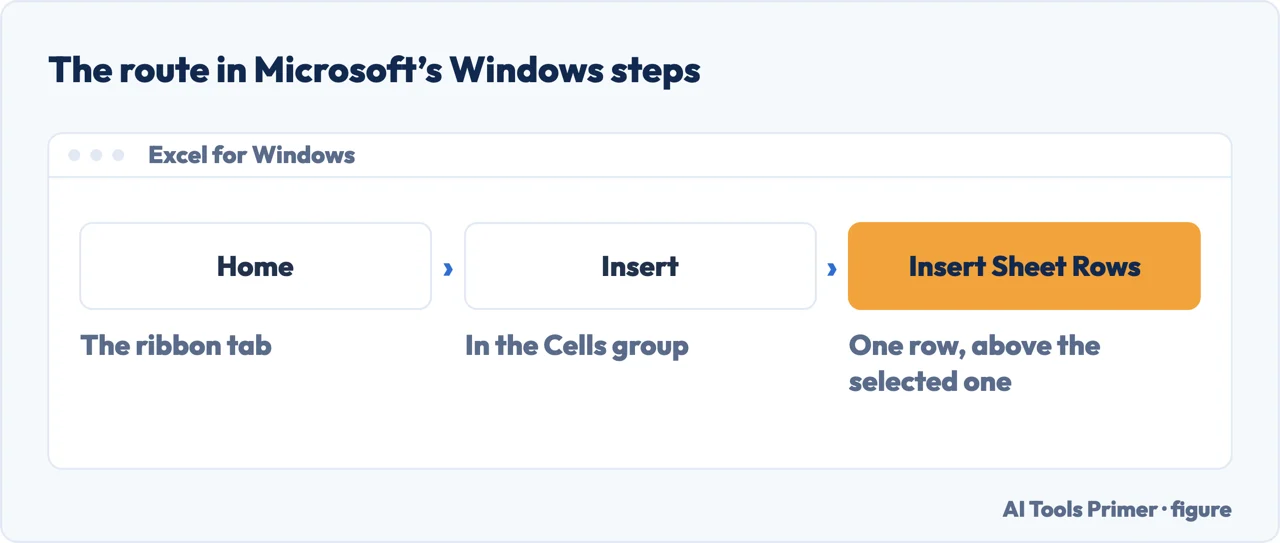
That is Microsoft, on Insert or delete rows and columns — in the Web tab. The Windows tab of the same page never says it. What it says instead is “Select any cell within the row, then go to Home > Insert > Insert Sheet Rows”, which inserts exactly one.
The Mac page has it too, with the example: “Select the same number of rows as you want to insert. For example, to insert five blank rows, select five rows.” And the Mac page was the only Microsoft Support page in the results Google showed for this question on 24 September 2026, which is how a Windows user can end up reading “Hold down CONTROL, click the selected rows”.
It is the same shape as the question next door: on grouping rows, Microsoft prints the Mac shortcut without the Mac procedure. Here it prints the rule for the Mac and for the browser, and leaves it out of the Windows steps.
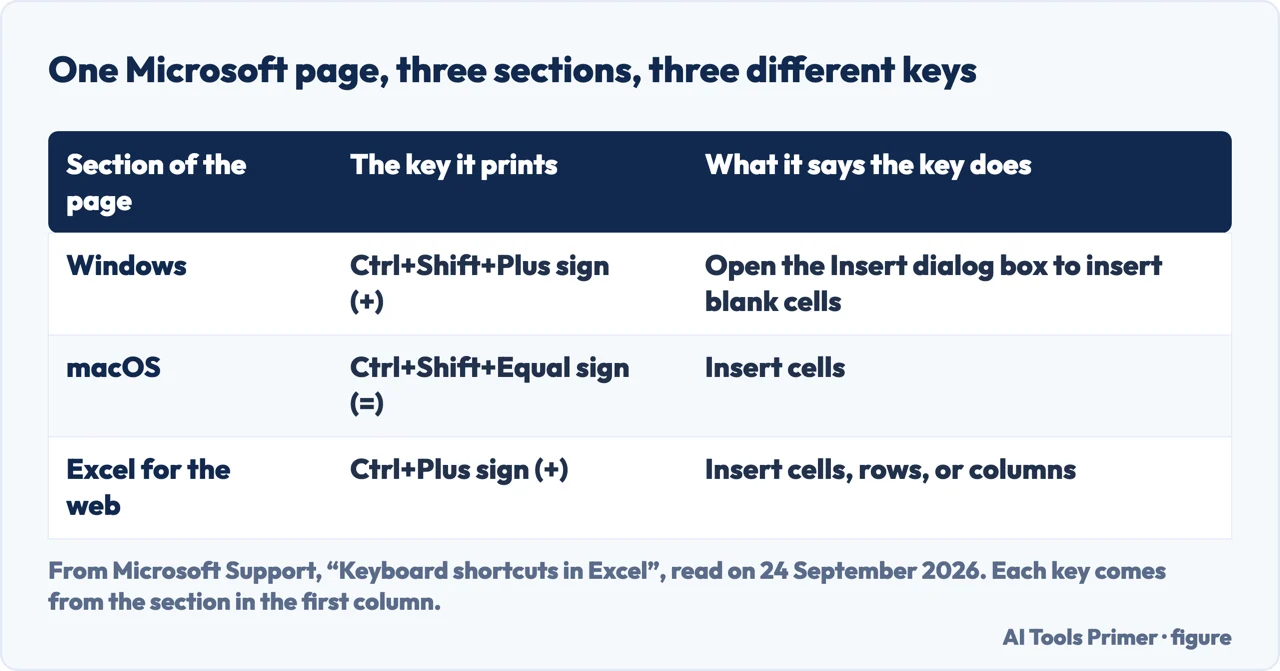
The keyboard is where this question gets confusing, and the confusion starts on Microsoft’s own page. One page, Keyboard shortcuts in Excel, carries three different keys for this job in three different sections: the Windows section gives Ctrl+Shift+Plus to “open the Insert dialog box to insert blank cells”, the macOS section gives Ctrl+Shift+Equal to “insert cells”, and the Excel for the web section gives Ctrl+Plus to “insert cells, rows, or columns”. The accepted answer on the forum thread Google put first on 24 September 2026 gives the third one — “Press Ctrl+Plus sign (+), then press R, and click OK” — to somebody who never said which Excel they were in. The R and the OK belong to a dialog that the shortcuts page does not describe.
Click the first row number in the grey margin and drag down to the last one you want.
Once the rows you need run past the bottom of the screen, the drag has to scroll the sheet as well.
Microsoft’s wording for a large range: click the first cell, “then hold down SHIFT while you click the last cell in the range. You can scroll to make the last cell visible.”
Reliable, and it still means finding row 500 with your eyes.
The small box to the left of the formula bar takes whole rows. Type 2:1001, press Enter, and a thousand rows are selected without a single scroll.
It is documented, on a Microsoft page that neither of the two insert pages links to.
Three of the four questions Google showed under this one on 24 September 2026 are about numbers — twenty rows, a hundred rows, a thousand rows — and for a thousand, dragging across the row numbers means scrolling the whole way. The Name box does it in one move, and it is documented on Select specific cells or ranges in Excel, a page that neither of the two insert pages links to. Type the rows, press Enter, then insert. The same box is how Microsoft reaches a hidden row 1, which has no row above it to click: that is on unhiding rows.
What comes with the new rows, and where the sheet stops
All four lines are Microsoft’s, read in full on 24 September 2026.
Four ways in.
Select as many rows as you want to insert. Microsoft writes it for the Mac and for the browser, and not in the Windows steps.
The same Microsoft page prints one key for Windows, another for a Mac and a third for the browser, and the accepted answer on Microsoft’s own forum gives the third.
Dragging across a thousand row numbers means scrolling the whole way. The Name box takes the range in one move, and it is documented on a page neither insert page links to.
New rows can arrive with formatting already on them, and Microsoft names the button that takes it off.
Select twenty rows by their numbers — click the first, then Shift-click the twentieth — right-click the selection and choose Insert. Microsoft’s rule is that you get as many new rows as you had selected.
Type the rows in the Name box to the left of the formula bar — 2:101 is rows 2 to 101, a hundred of them — press Enter, then right-click the selection and choose Insert. The new rows go in above row 2.
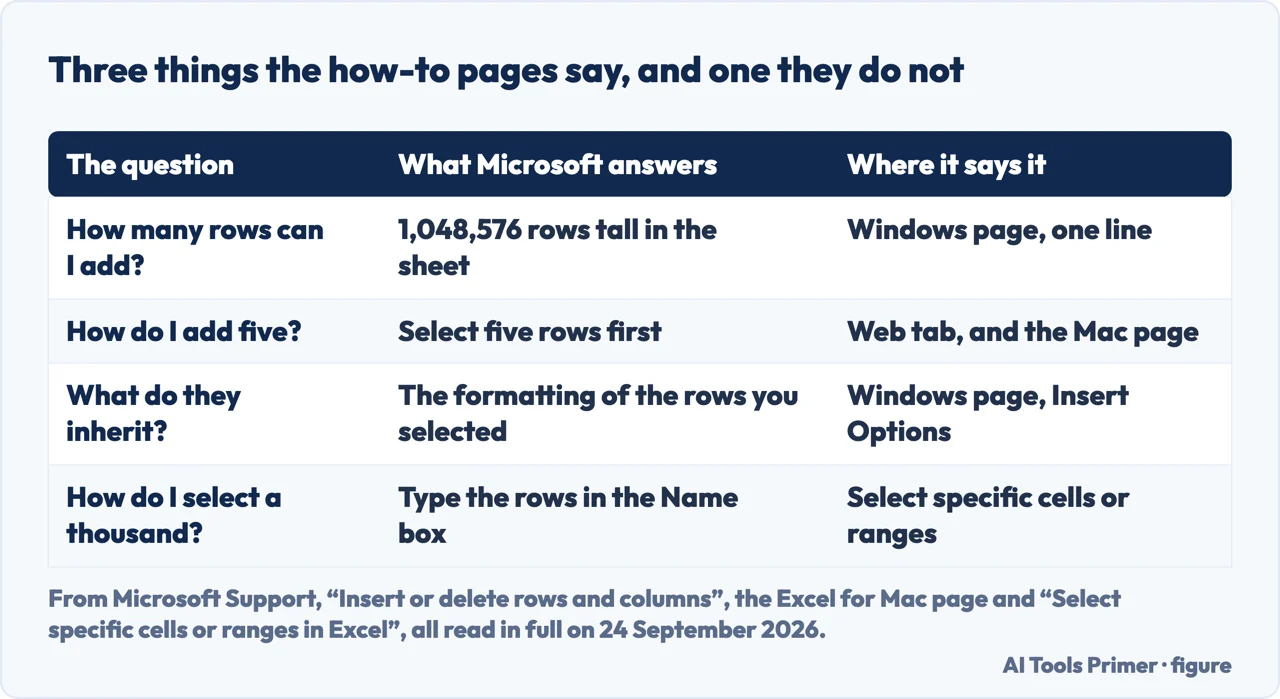
The same way, with 2:1001. The sheet has room — Microsoft gives it as “16,384 columns wide by 1,048,576 rows tall” — unless something sits in the last rows, and then Excel says it “cannot shift nonblank cells off the worksheet”.
Three, one for each section of Microsoft’s shortcuts page: Ctrl+Shift+Plus on Windows, which opens the Insert dialog, Ctrl+Shift+Equal on a Mac, and Ctrl+Plus in Excel for the web.
Because they inherit. Microsoft: “that formatting will be transferred to a new row or column that you insert”. Use the Insert Options brush that appears beside them and choose Clear Formatting.
That is a different question with a different answer: it is SUM, not Insert. Select the cell under the column and use AutoSum, or type =SUM() around the range.
Not covered here. It does not cover inserting columns, which is the same four pages with the word changed and one difference worth knowing: the new columns arrive to the left of what you selected.
It does not cover Google Sheets, which has its own menus and its own help pages for this job.
And it does not cover deleting rows, or the blank rows left behind by a filter, which are two different jobs with two different commands. What holds instead is simple: every rule, key and limit here is quoted from the Microsoft page that publishes it, with the section of that page it came from.
Written by Alberto Gulotta
Founder and editor of AI Tools Primer, writing from Palermo, Italy. Thirty-five years of taking computers apart, starting with a Commodore 64 — the long version is on the about page.
Something wrong on this page? Write to aitoolsprimer@gmail.com and it gets fixed.
Written on 25 September 2026.
Independence and limits
No affiliate links and no paid placements anywhere on this site. Nobody pays to appear here, and no company has seen this page before you did.
This is general information, not professional advice. Where a page touches money, health, safety or the law, it names its source and the date it was read — and your situation may still differ. See the privacy page and the cookie policy.